Download Dynamics 365 Audit History
Dynamics 365 has excellent auditing capabilities, however you cannot extract of the full audit trail in bulk out of the box but are required to do item by item extraction.

Below we will cover how you can use Data Sync to export the audit data from Dynamics 365 in bulk including all of the change details. This solution requires three steps:
- Extraction of the core 'Audit' entity into a SQL Server table.
- For each Audit entity the extraction of the detailed audit record into a 'Dynamic Column'.
- Filtering out subsequent requests so that we do not repeatedly extract the same audit detail unnecessarily.
Requirements
Before getting started you need to ensure you have the following:
- Windows 10 or Windows Server
- Downloaded & Installed Data Synchronisation Studio
- Access to Dynamics 365
- Configured your connection to Dynamics 365 in Data Sync
- Access to SQL Server or SQL Express
If you do not have Data Synchronisation Studio you can get a free evaluation edition to try this out.
Extract the Audit Data for each Row
Start by opening Data Sync and connecting your source window to the audit entity in Dynamics. You can do this by expanding the connection for your Dynamics connection in the connection tree window.
We then need to create a Dynamic Column to hold the complete audit details for each entity.
To create a Dynamic Column you need to start by enabling Dynamic Columns. To do this go to View > Dynamic Columns Window > Enable Dynamic Columns
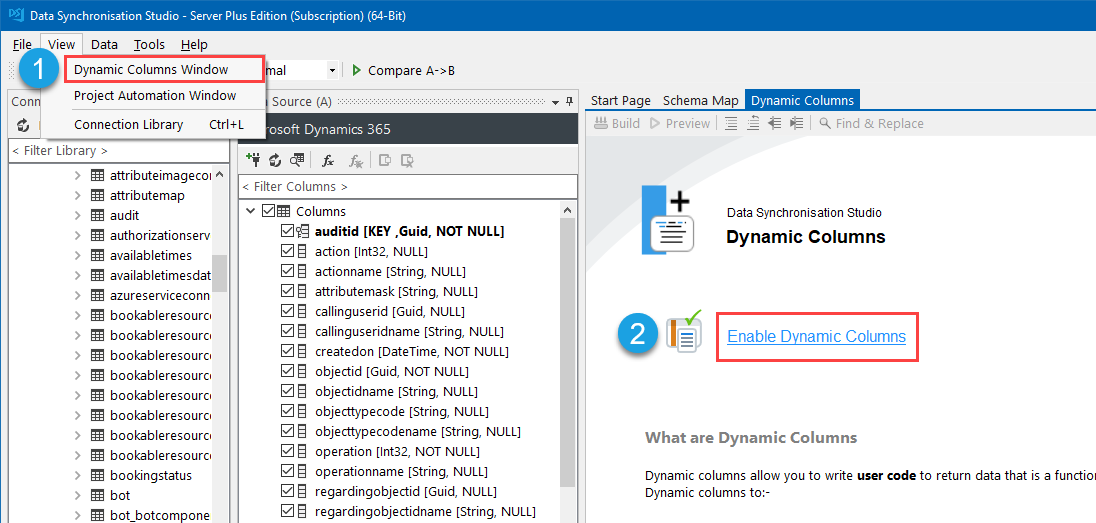
Dynamic Columns allow us to create new columns from code. This code can re-use the source and target connections as well as the values of the current row it is connected to.
This process requires the use of C# code to extract the audit details for each row, only if there has been a change to the data.
The first step is to add the references to the necessary Dynamics SDKs. Add the references below to the default template:
using Microsoft.Xrm.Sdk;
using Microsoft.Xrm.Sdk.Query;
using Microsoft.Xrm.Sdk.Client;
using Microsoft.Xrm.Sdk.Messages;
using Microsoft.Xrm.Sdk.Metadata;

using System.Runtime.Serialization;
using System.Xml;
using System.IO;

// These namespaces are found in the Microsoft.Crm.Sdk.Proxy.dll assembly
// located in the SDK\bin folder of the SDK download.
using Microsoft.Crm.Sdk.Messages;
We will then add the code to create the column that will hold the audit data. This data will be returned as an XML formatted string which can be stored in a SQL table. In the code below the column is called auditdetails, add this between the BeginRow() and Setup() methods.
public string auditdetails { get {


        //Only get the audit details if there is a create,  update or delete
        if(actionname =="Update" | actionname =="Create"| actionname =="Delete")
        {
            Trace.WriteLine("Row {0}",NEXTINT());

            //Use the current connection
            Simego.DataSync.Providers.MSCrm2011.MSCrmDataSourceReader reader = (Simego.DataSync.Providers.MSCrm2011.MSCrmDataSourceReader) this.DataSourceA.Reader;
            var orgService = reader.Connection.GetProxy();
            //Create a history request
            RetrieveRecordChangeHistoryRequest changeRequest = new RetrieveRecordChangeHistoryRequest();
            changeRequest.Target = new EntityReference(this.objecttypecode, this.objectid);

            //Get the history request from the CRM system
            RetrieveRecordChangeHistoryResponse changeResponse = (RetrieveRecordChangeHistoryResponse)orgService.Execute(changeRequest);

            //Serialise the response into an xml string
            using (var stringWriter = new StringWriter())
            {
                XmlWriterSettings settings = new XmlWriterSettings { Indent = true };
                using (var writer = XmlWriter.Create(stringWriter,settings))
                {
                    var contractSerializer = new DataContractSerializer(typeof(RetrieveRecordChangeHistoryResponse), new List<Type> (new [] { typeof(AuditDetailCollection), typeof(RolePrivilegeAuditDetail) } ));
                    contractSerializer.WriteObject(writer,changeResponse);
                }
                return stringWriter.ToString();
            }
        }
        //return nothing if it is not create,  update or delete
        return"";
    } }
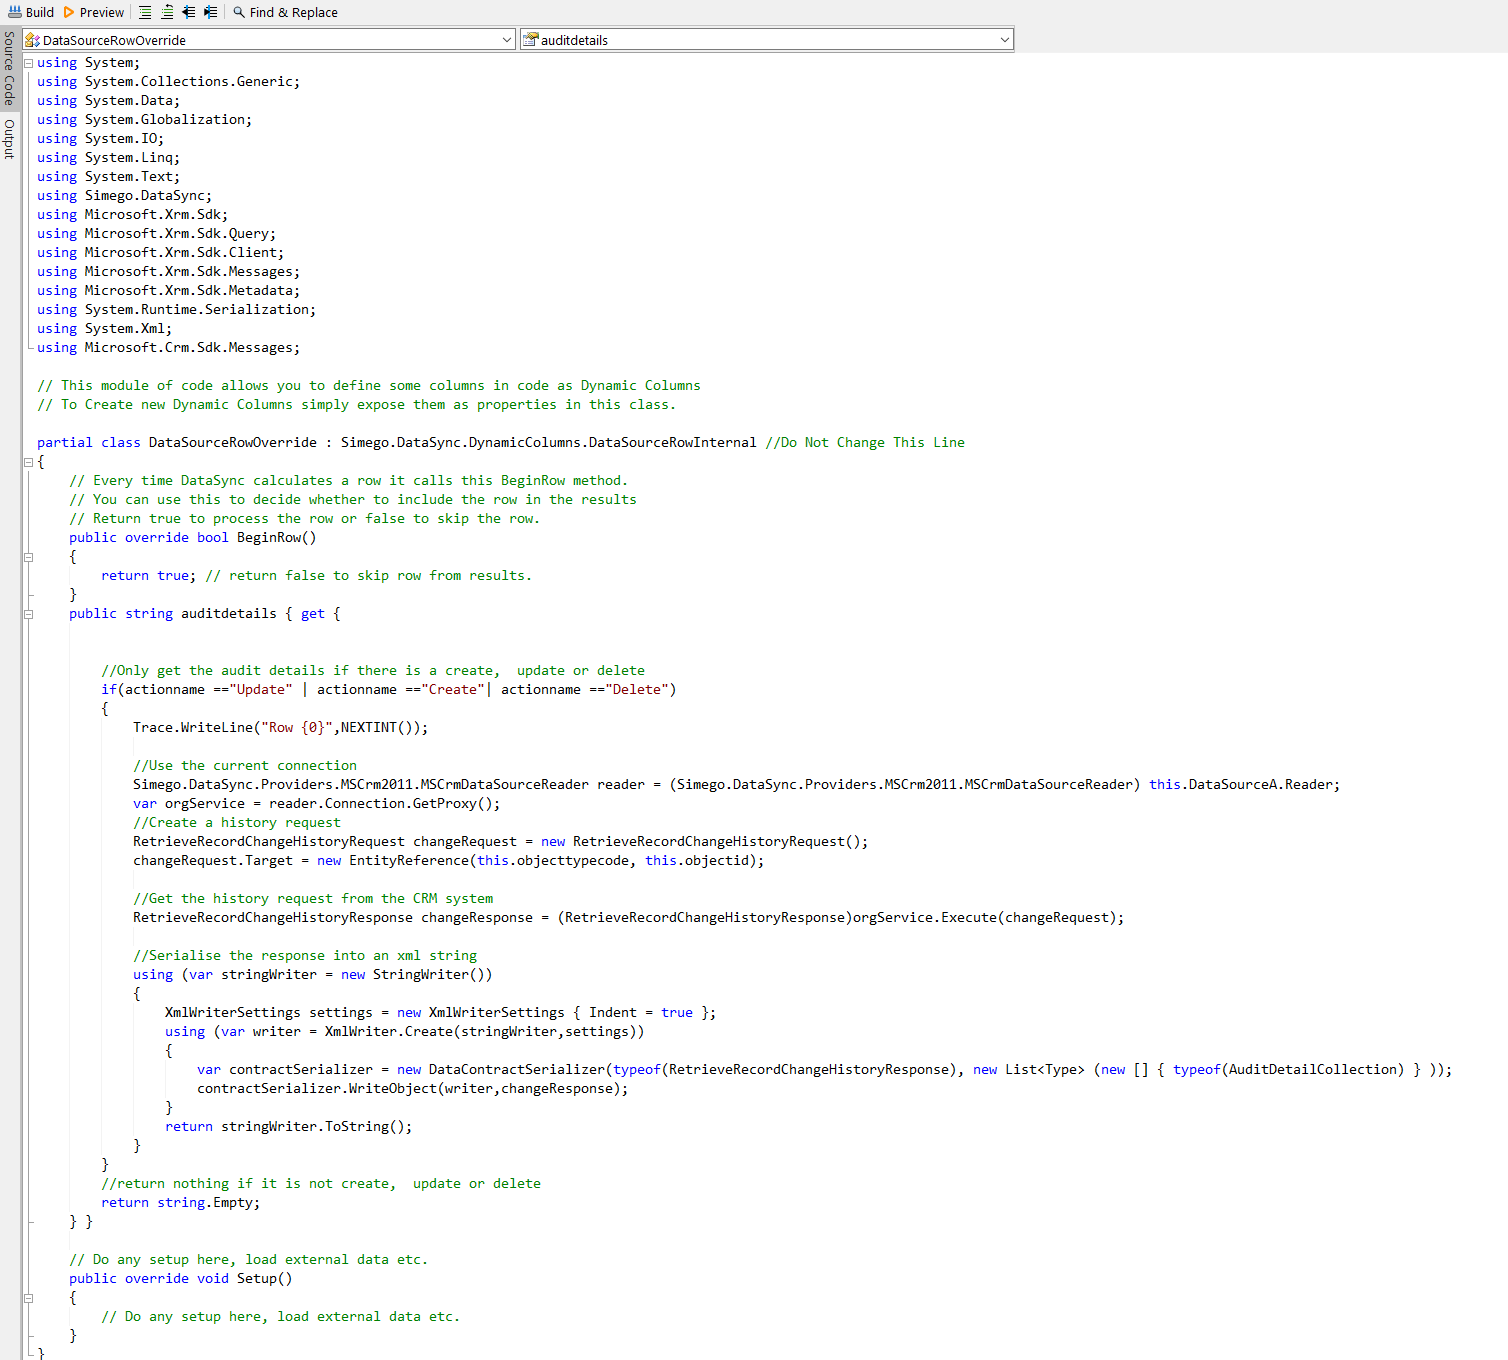
This result is essentially the exact contents of a 'RetrieveRecordChangeHistoryResponse' as defined by the Dynamics CRM SDK. Why did we do this? We can then at a later date extract the full details of the change by loading it back into a RetrieveRecordChangeHistoryResponse (using serialize and deserialize).
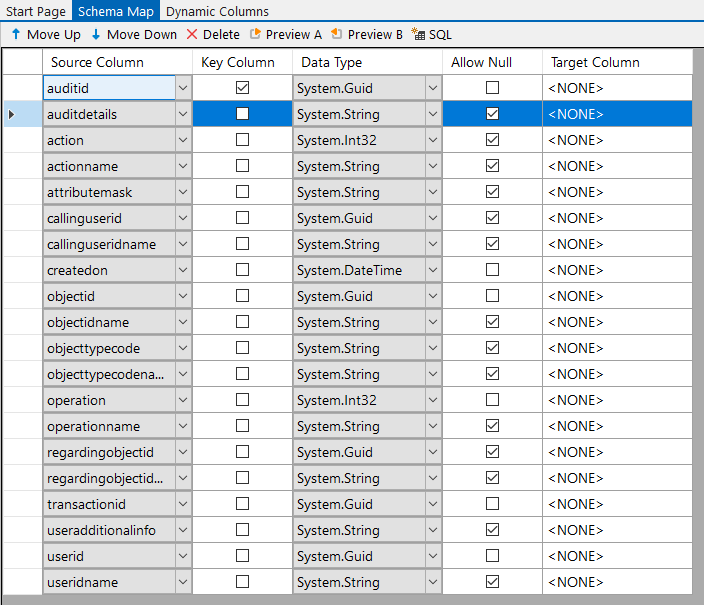
Pressing the Build button converts the auditdetails code into a column and this can be added to the schema map
Create a new SQL Table
We can now create a new SQL Table from the columns added to the schema map. To do this go to Tools > Create SQL Table.
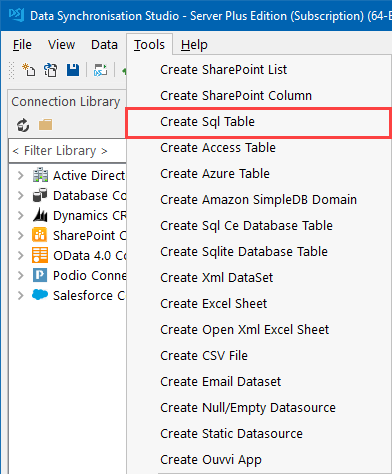
This will open the SQL wizard where you can connect to your SQL database and define a name for the table.
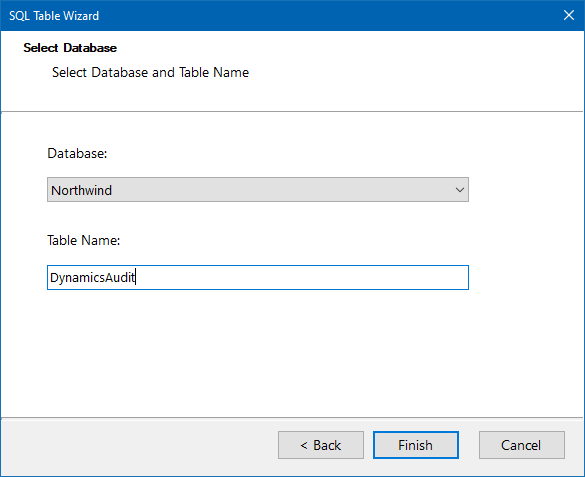
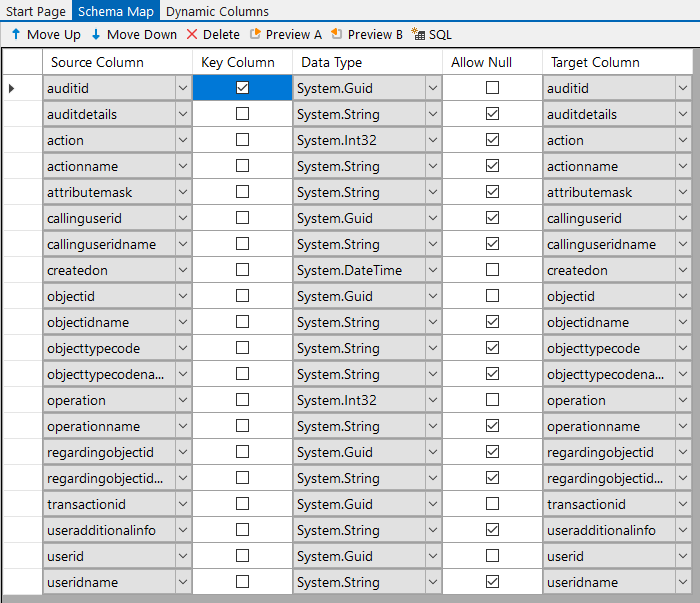
Once you are done, click OK and the table will be loaded into the target data source. The columns should automatically map to their corresponding column but please check the schema map to make sure.
You also need to ensure there is a key column selected, the auditid column.
Compare and Sync the Results
You can now run the compare by clicking on the Compare A > B button in the toolbar to preview the audit data to be added to the SQL table.
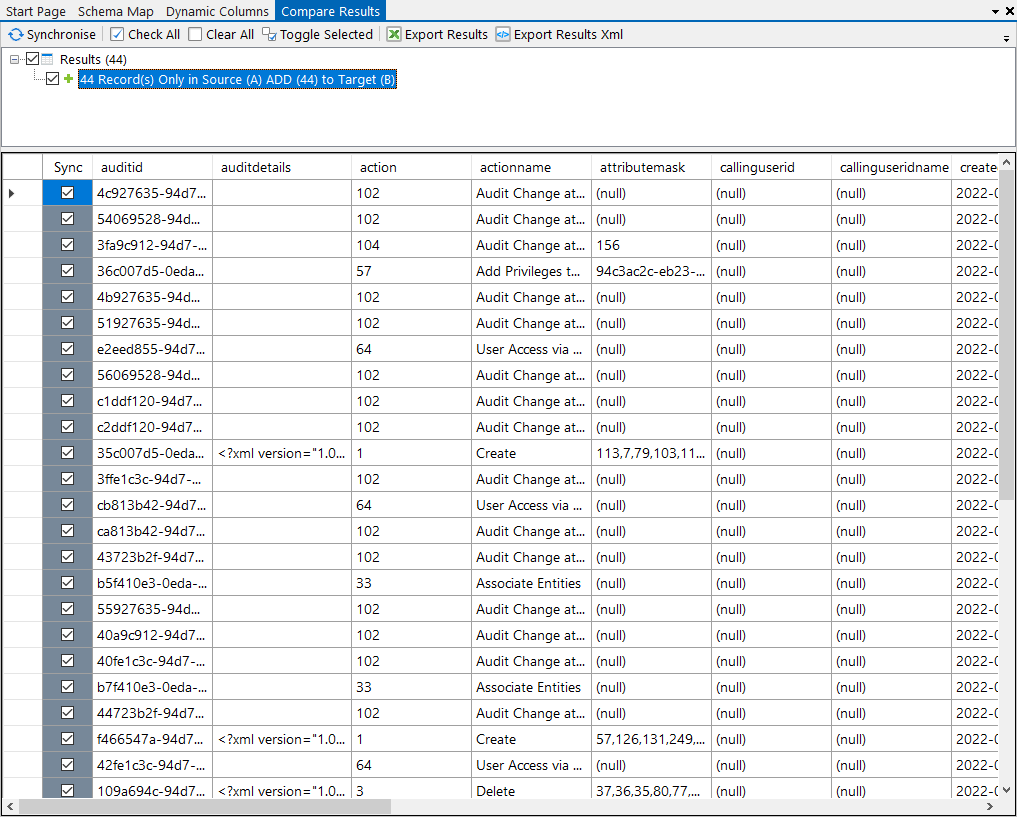
Once you are ready click Synchronise and then Start to begin the sync. Your audit data will then be synchronised to your SQL table.
Automate, Schedule & Optimise
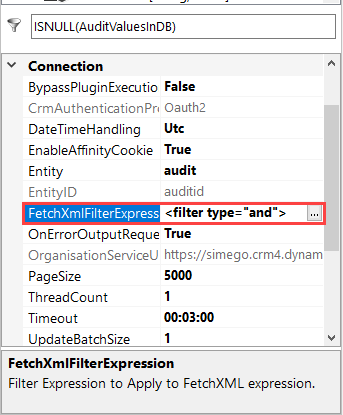
Once the initial project has been run to get the SQL table up to date we can filter the results using a fetchxml filter to only return audit data that was created in the last two days. This project will be run on a daily basis, but having at least two days data will allow for some time if there are errors and the project doesn't run.
We can add the filter expression to the source project property FetchXMLFilterExpression to extract only the audit entries that were created in the last 2 days.
We can run this extract every day and in the case that we do not run it for a day it will catch up without writing duplicates as Data Sync will reconcile the changes first before writing any records.
<filter type="and">
     <condition attribute="createdon" operator="last-x-days" value="2" />
</filter>
You can now save the project and either run it manually when you need it or you can schedule it to run on a daily basis using either Ouvvi or the Run Tool.
To schedule the project in the Run Tool go to Tools > Open Project in Run Tool and then save the Run Tool project to your local files. You can then go to task scheduler and configure when you would like the project to run.
Alternatively to schedule the project in Ouvvi you will need to upload the project file and connection files to your Ouvvi site, or you can create the project in a Data Sync step opened from Ouvvi. If you have not already created an Ouvvi instance please take a look at our documentation here.
Once you have the project scheduled it will then run automatically at the interval you set.
