Data Sync Connector for JSON Web APIs
Easily connect to JSON APIs with No-Code using the new JSON API Designer
We have come up with a new way to easily connect Data Sync V6 to virtually any JSON based Web API.
Features
- Read/Write Data Access (New! Write access as of version 6.0.3300)
- Define Multiple Datasources
- Automatic API Definition Discovery
- Parametrized configuration variables
- Authentication
- OAuth2 (authorization_code and client_credentials flows)
- Basic Authentication
- Http Headers
- Authorization Header (Bearer Authentication)
- For Each Loops
- Paging Requests
- HTTP Fetch (GET, POST, PUT, PATCH, DELETE)
- Read Json File
- Lookups
- Connection Registry
- XML based API definition
- API GUI Designer
JSON API Designer
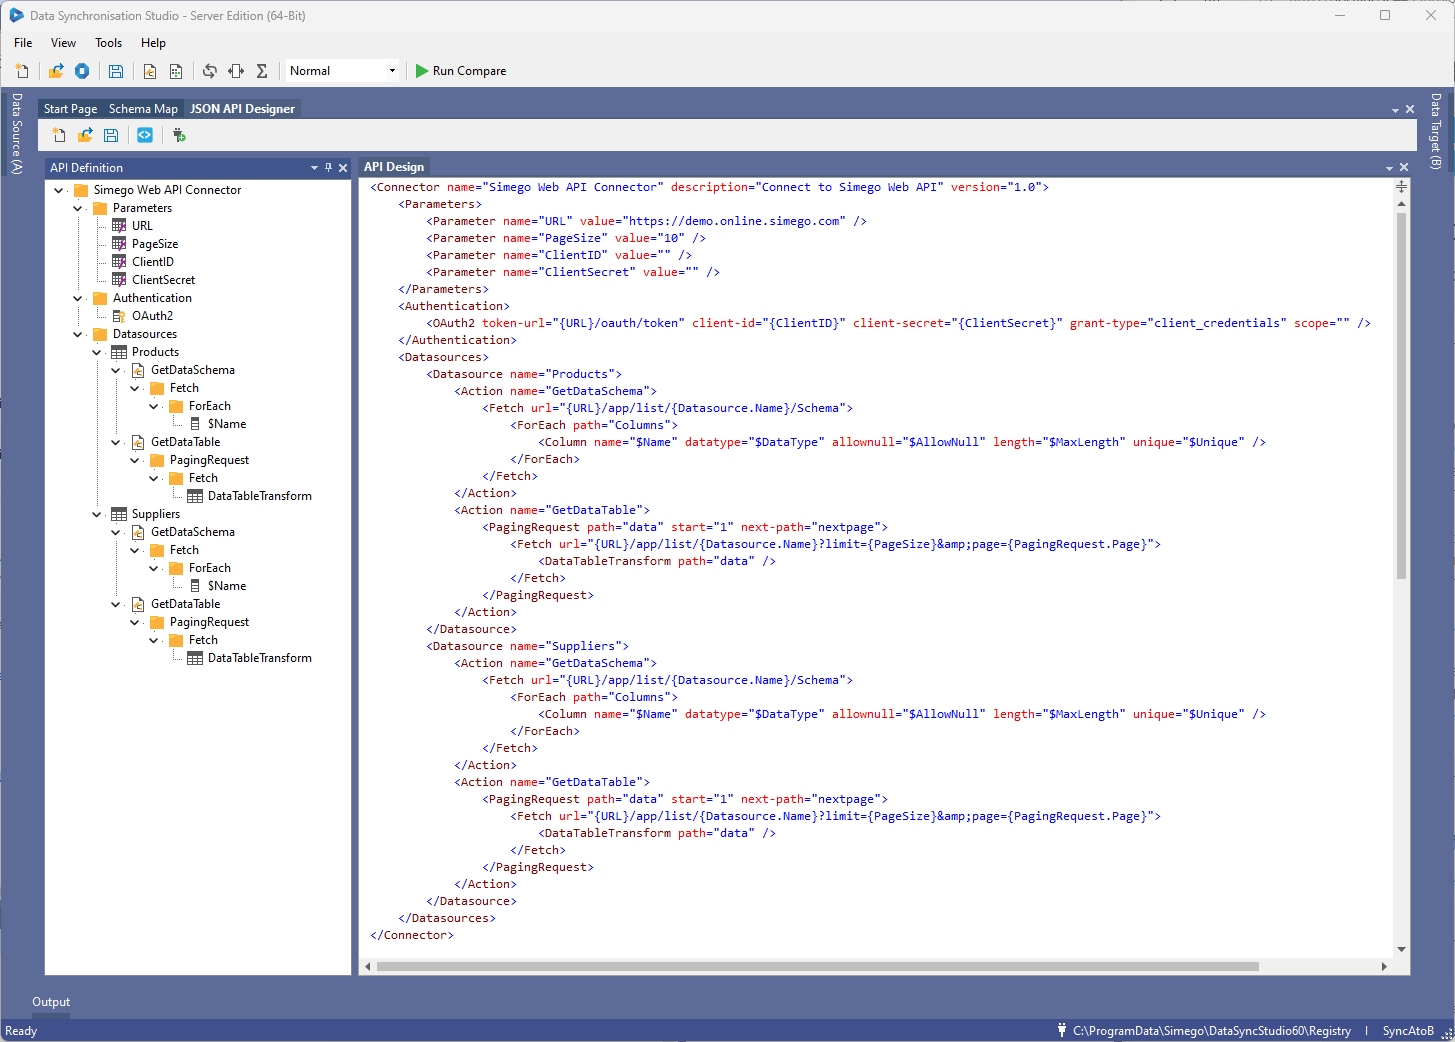
The JSON API Designer Tools->JSON API Tool in Data Sync makes it easy to create the XML API definition for the API.
The Designer also allows for quick API configuration by way of an Automatic configuration from a URL, We will load the JSON from the URL and attempt to define a Schema and Fetch operation automatically.
From the Designer you can quickly connect your API to the source or target of your project.
In the screenshot below we have loaded an API definition for multiple datasources which also use a Dynamic Schema and OAuth2 based authentication.
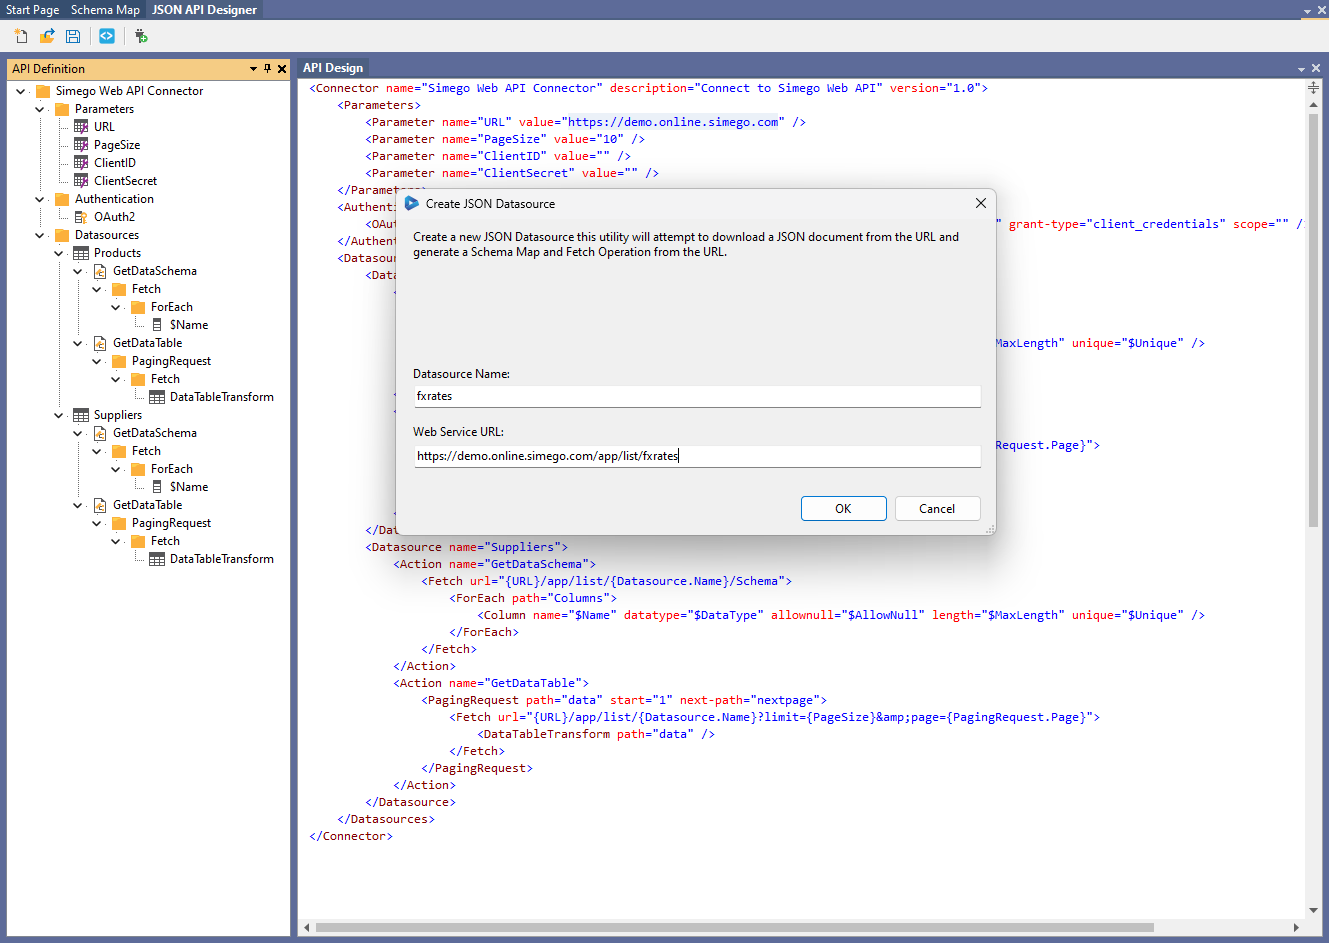
Auto Generate API Specification
You can automatically generate the API specification from a URL using the Add Datasource from URL function. This will attempt to download the json response and build the datasource specification from the response.
Simple API Definition
The connector is based on a simple XML Schema which defines the operations required for the connector to function. Data Sync connectors require 2 main functions GetDataSchema which must return the datasource schema to define the schema map. GetDataTable which returns the data as a Data Table.
The API XML definition below describes a simple API and defines a Static Schema Map, URL to fetch the response and a Data Transform to fill the Data Table from the response.
<Connector name="ODataV4 Sample" description="Connect to an OData V4 Feed" version="1.0">
  <Datasources>
    <Datasource name="People">
      <Actions>
        <Action name="GetDataSchema">
          <StaticSchemaMap>
            <Column name="UserName" type="System.String" unique="true" allownull="false" />
            <Column name="FirstName" type="System.String" length="255" />
            <Column name="LastName" type="System.String" />
            <Column name="Emails" type="JArray" />
          </StaticSchemaMap>
        </Action>
        <Action name="GetDataTable">
          <Fetch url="https://services.odata.org/TripPinRESTierService/People">
            <DataTableTransform path="value" />
          </Fetch>
        </Action>
      </Actions>
    </Datasource>
  </Datasources>
</Connector>
Data Paging
Many JSON APIs implement some form of Data paging where they limit the number of records returned in the response.
These can be implemented in many random ways and we have built a PagingRequest function to handle the most common.
Page Counter
The most simple is the Page counter where we keep incrementing a page number until the response returns an empty response.
<PagingRequest path="data" start="1"> <Fetch url="{URL}/app/list/{Datasource.Name}?limit={PageSize}&page={PagingRequest.Page}"> <DataTableTransform path="data" /> </Fetch> </PagingRequest>
Next Page Token
The next page token method is based on extracting the value for the next page and passing it in the next request until the next page token is empty.
<PagingRequest path="data" start="1" next-path="nextpage"> <Fetch url="{URL}/app/list/{Datasource.Name}?limit={PageSize}&page={PagingRequest.Next}"> <DataTableTransform path="data" /> </Fetch> </PagingRequest>
Alternatively if the Next Page token returns a URL to the next page of results then you can use it like this.
Where you pass the first page in the next token which sets up the initial request and the next page URL is returned from next-path token.
The paging process will complete when the value of the next-page token returns null or empty string.
<PagingRequest path="data" start="1" next="{URL}/app/list/{Datasource.Name}?limit={PageSize}" next-path="next">
  <Fetch url="{PagingRequest.Next}">
    <DataTableTransform path="data" />
  </Fetch>
</PagingRequest>
Next Page Token with Continuation Parameter
Requires DataSync Version: 6.0.3532+
This is a variation on the Next Page token for when the last page returns the current page token instead of null to signal the end. Instead it uses another value to tell you whether to continue or not.
Here we use while-path and while-path-value which are used with a string equality check to decide if the loop should continue.
In the example below the loop continues all the time meta.has_more equals 'True'.
<PagingRequest path="data" start="1" next="{URL}/app/list/{Datasource.Name}?limit={PageSize}" next-path="next" while-path="meta.has_more" while-path-value="True">
  <Fetch url="{PagingRequest.Next}">
    <DataTableTransform path="data" />
  </Fetch>
</PagingRequest>
Skip & Take
If your API is based on a Skip and Take page counter then you can use the PagingRequest like this.
Where you can use the internal PagingRequest.Count counter to manage the row index. start is used to set the initial counter value.
The process continues until the API returns an empty response.
<PagingRequest start="0" path="data"> <Fetch url="{URL}/app/list/{Datasource.Name}?skip={PagingRequest.Count}&take={PageSize}"> <DataTableTransform path="data" /> </Fetch> </PagingRequest>
Indexed Paging
Indexed paging is based on paging through rows using an Index. Each iteration of the page we move the index along according to the page size parameter value. The paging stops when the API returns an empty response or HTTP status code 204.
So you will see requests like this
- GET /app/list/products?startIndex=0&endIndex=10
- GET /app/list/products?startIndex=11&endIndex=20
- GET /app/list/products?startIndex=21&endIndex=30
- GET /app/list/products?startIndex=31&endIndex=40
<PagingRequest page-size="{PageSize}">
    <Fetch url="{URL}/app/list/{Datasource.Name}?startIndex={PagingRequest.StartPageIndex}&endIndex={PagingRequest.EndPageIndex}">
        <DataTableTransform path="data" />
    </Fetch>
</PagingRequest>
Parent Child
Perhaps you need to call the API multiple times based on the results of an API call. In this case we have the ForEach function which can be used to loop over the results.
In the example below we get a List of Suppliers and then Get a List of Products for each of those Suppliers whilst still using a PagingRequest.
<Fetch url="{URL}/app/list/suppliers"> <!-- For Each SupplierID get the related Products --> <ForEach path="data"> <!-- Handle Paging for the Product List --> <PagingRequest path="data" start="1" next-path="nextpage"> <Fetch url="{URL}/app/list/products?filter=SupplierID%20eq%20{$SupplierID}&page={PagingRequest.Page}"> <DataTableTransform path="data" /> </Fetch> </PagingRequest> </ForEach> </Fetch>
Stacked Response
Perhaps you need to extract multiple parts from the Json Response, in this example we pull out the all the bank holidays from UK gov feed and assign a static value to the region column.
<Fetch url="https://www.gov.uk/bank-holidays.json">
  <DataTableTransform path="england-and-wales.events">
    <ColumnMap value="england-and-wales" to="region" />
  </DataTableTransform>
  <DataTableTransform path="scotland.events">
    <ColumnMap value="scotland" to="region" />
  </DataTableTransform>
  <DataTableTransform path="northern-ireland.events">
    <ColumnMap value="northern-ireland" to="region" />
  </DataTableTransform>
</Fetch>
Post Request
If you need to Post data to your endpoint rather than a Get request. You can specify the method of the request and add a body.
<Action name="GetDataTable">
    <Fetch method="POST" url="{URL}">
        <Body content-type="application/x-www-form-urlencoded">
            <Item name="Item1" value="value1" />
            <Item name="Item2" value="value2" />
        <Body>
        <DataTableTransform path="value" />
    </Fetch>
</Action>
You can also specify the Body as a raw body value by using the BodyContent element.
<Action name="GetDataTable">
    <Fetch method="POST" url="{URL}">
        <BodyContent content-type="application/x-www-form-urlencoded">
            Item1=value1&Item2=value2
        <BodyContent>
        <DataTableTransform path="value" />
    </Fetch>
</Action>
Read File
You can read json from a local file as well by using the ReadFile action and specifying the path to the file.
<Datasource name="fxrates">
  <Action name="GetDataSchema">
    <StaticSchemaMap>
      <Column name="Currency" data-type="System.String" key="true" />
      <Column name="Rate" data-type="System.Decimal" />
    </StaticSchemaMap>
  </Action>
  <Action name="GetDataTable">
    <ReadFile path="fxrates.json">
      <DataTableTransform />
    </ReadFile>
  </Action>
</Datasource>
Authentication
We have several Authentication options where you only need to specify the authentication scheme to use in the Authentication section. All subsequent requests will then use the authentication details.
Basic Authentication
You can specify that the connector uses Basic Authentication by adding the BasicAuth authentication scheme.
<Authentication>
  <BasicAuth username="username" password="password" />
</Authentication>
OAuth2 Authentication
You can specify that the connector uses OAuth either client_credentials flow or authorization_code flow by adding the OAuth2 authentication scheme.
<Authentication>
  <OAuth2 authorise-url="{authorize-url}" token-url="{token-url}" client-id="{client-id}" client-secret="{client-secret}" grant-type="authorization_code" scope="{scope}" prompt="select_account" />
</Authentication>
You can now use certificate based OAuth2 flows via the certificate-thumbprint attribute.
<Authentication>
    <OAuth2 token-url="{token-url}" client-id="{client-id}" grant-type="client_credentials" scope="{scope}" certificate-thumbprint="{thumbprint}" />
</Authentication>
Http Headers
You can add HttpHeaders to the request by adding multiple HttpHeader types to the authentication scheme.
<Authentication>
  <HttpHeader name="OData-Version" value="4.0" />
  <HttpHeader name="OData-MaxVersion" value="4.0" />
</Authentication>
Authorization Header
You can specify an Http Authorization Header like this.
<Authentication>
 <AuthorizationHeader type="Bearer" token="{api-token}" />
</Authentication>
Using Project Automation
Should you require calling an API to get an access token but the API is not OAuth2 but some home grown API then you
can use Project Automation to call the API manually and setup the Authorization Header.
Enable Project Automation and implement the Start() method like this. This will call the Authentication API and add the access token to the API definition at runtime.
public override void Start()
{
	var helper = new  HttpWebRequestHelper();
	var response = helper.PostRequestAsJson(new { email = "username", password = "password" }, "https://localhost:2026/api/login");

	DataSourceA.AuthorizationHeader.Token = response["access_token"]?.ToObject<string>();
}
Or you could manually call an OAuth endpoint like this to set the Token on the AuthorizationHeader.
public override void Start()
{
	var helper = new HttpWebRequestHelper();
	var result = helper.PostRequestAsString(new Dictionary<string, string> {  { "client_id", "client_xyz_" }, { "client_secret", "secret_xyz_"}, { "grant_type", "client_credentials" } }, HttpWebRequestHelper.MimeTypeApplicationWwwFormUrlEncoded, "http://localhost:8080/oauth/token");

	DataSourceA.AuthorizationHeader.Token = (string)HttpWebRequestHelper.FromJsonToDictionary(result)["access_token"];
}
Column Mapping
The DataTableTransform action will automatically map columns from the json response to the DataTable based on the schema map mapping the columns by name (case-sensitive).
If you want to manage the mapping or add additional mappings then you can add ColumnMap nodes to the DataTableTransform.
For example mapping a Json node Currency to a Schema Column named CCY. The Path here is a JsonPath expression and therefore can select complex nodes.
<DataTableTransform>
 <ColumnMap path="Currency" to="CCY" />
</DataTableTransform>
If you want to map a static value to a column you can also do this with the value attribute like this.
<DataTableTransform>
 <ColumnMap value="1" to="version" />
</DataTableTransform>
If you need to pull a value from the parent of the current json context. You can use the parent-path attribute.
<Action name="GetDataTable">
  <!-- Fetch the list of invoices from a json file -->
  <ReadFile path="invoices.json">
   <!-- For each invoice, get the related Line Items -->
   <ForEach path="invoices">
    <DataTableTransform path="line_items">
     <!-- Get the Invoice ID from the parent element -->
     <ColumnMap parent-path="id" to="invoice_id" />
      </DataTableTransform>
   </ForEach>
 </ReadFile>
</Action>
If you need to select part of a value from a string inside an json element you can use a Regular Expression with the expression attribute.
The first group match will be returned as the value for the column.
<DataTableTransform path="contacts">
    <ColumnMap path="address" to="_internalID" expression="R:(\d{3,})" />
</DataTableTransform>
To select the OData ETag element use this format because of the @ in the name.
<ColumnMap path="$.['@odata.etag']" to="etag" />
Debugging
You can add a column to the StaticSchemaMap to hold a copy of the row json object so you can see the raw json per row in the Data Sync data preview. You then add a ColumnMap to the DataTableTransform to map the json to the column like this below.
<Datasource name="fxrates">
  <Action name="GetDataSchema">
    <StaticSchemaMap>
      <Column name="Currency" data-type="System.String" key="true" />
      <Column name="Rate" data-type="System.Decimal" />
      <Column name="__json" data-type="JToken" />
    </StaticSchemaMap>
  </Action>
  <Action name="GetDataTable">
    <ReadFile path="fxrates.json">
      <DataTableTransform>
        <ColumnMap path="$" to="__json" />
      </DataTableTransform>
    </ReadFile>
  </Action>
</Datasource>
You can also trace to the Data Sync Output window the entire Json Document by using the TraceElement action type like this.
<Datasource name="fxrates">
  <Action name="GetDataSchema">
    <StaticSchemaMap>
      <Column name="Currency" data-type="System.String" key="true" />
      <Column name="Rate" data-type="System.Decimal" />
    </StaticSchemaMap>
  </Action>
  <Action name="GetDataTable">
    <ReadFile path="fxrates.json">
      <DataTableTransform />
      <TraceElement />
    </ReadFile>
  </Action>
</Datasource>
Putting it all together
The example below puts everything together to create a OAuth2 authenticated JSON API connection to return a Products dataset by Looking up the Products for Each Supplier and paging the returned results.
<!-- An Example REST API connector which will use 2 requests * First to return a List of Suppliers * Second to loop around the Suppliers and return a List of Products for each Supplier. --> <Connector name="Simego Web API Connector" description="Connect to Simego Web API" version="1.0"> <Parameters> <Parameter name="URL" value="https://demo.online.simego.com" /> <Parameter name="PageSize" value="10" /> <Parameter name="ClientID" value="" /> <Parameter name="ClientSecret" value="" /> </Parameters> <Authentication> <OAuth2 token-url="{URL}/oauth/token" client-id="{ClientID}" client-secret="{ClientSecret}" grant-type="client_credentials" /> </Authentication> <Datasources> <Datasource name="Products"> <Action name="GetDataSchema"> <!-- Define Static Schema for this Datasource --> <StaticSchemaMap> <Column name="ProductID" data-type="System.Int32" /> <Column name="SupplierID" data-type="System.Int32" /> <Column name="ProductName" data-type="System.String" /> </StaticSchemaMap> </Action> <Action name="GetDataTable"> <!-- First get a List of Supplier ID values --> <Fetch url="{URL}/app/list/suppliers?columns=SupplierID&limit=1000"> <!-- For Each SupplierID get the related Products --> <ForEach path="data"> <!-- Handle Paging for the Product List --> <PagingRequest path="data" start="1" next-path="nextpage"> <Fetch url="{URL}/app/list/products?filter=SupplierID%20eq%20{$SupplierID}&limit={PageSize}&page={PagingRequest.Page}"> <DataTableTransform path="data" /> </Fetch> </PagingRequest> </ForEach> </Fetch> </Action> </Datasource> </Datasources> </Connector>
Or in this example we can call the Microsoft Graph API whilst using OAuth2 authorization_code flow.
<Connector name="MS Graph API" description="Test quering Graph API via JSON API" version="1.0">
  <Parameters>
    <Parameter name="url" value="https://graph.microsoft.com/beta" />
    <Parameter name="authorize-url" value="https://login.microsoftonline.com/cfb0271d-de7d-4732-9414-957ca405620b/oauth2/v2.0/authorize" />
    <Parameter name="token-url" value="https://login.microsoftonline.com/cfb0271d-de7d-4732-9414-957ca405620b/oauth2/v2.0/token" />
    <Parameter name="client-id" value="" />
    <Parameter name="client-secret" value="" />
    <Parameter name="scope" value="https://graph.microsoft.com/.default offline_access" />
  </Parameters>
  <Authentication>
    <OAuth2 authorise-url="{authorize-url}" token-url="{token-url}" client-id="{client-id}" client-secret="{client-secret}" grant-type="authorization_code" scope="{scope}" prompt="select_account" />
    <HttpHeader name="OData-Version" value="4.0" />
    <HttpHeader name="OData-MaxVersion" value="4.0" />
  </Authentication>
  <Datasources>
    <Datasource name="users">
      <Actions>
        <Action name="GetDataSchema">
          <StaticSchemaMap>
            <Column name="id" type="System.String" />
            <Column name="givenName" type="System.String" />
            <Column name="mail" type="System.String" />
          </StaticSchemaMap>
        </Action>
        <Action name="GetDataTable">
          <Fetch url="{url}/users">
            <DataTableTransform path="value" />
          </Fetch>
        </Action>
      </Actions>
    </Datasource>
  </Datasources>
</Connector>
Or in this example we call the Dynamics CRM/Dataverse API whilst using OAuth2 authorization_code flow with a certificate.
This example shows how to implement data paging with an ODataV4 endpoint.
<Connector name="Dynamics365" description="" version="1.0">
	<Authentication>
		<HttpHeader name="OData-Version" value="4.0" />
		<HttpHeader name="OData-MaxVersion" value="4.0" />
		<HttpHeader name="Prefer" value="odata.maxpagesize=10" />
		<OAuth2 token-url="https://login.microsoftonline.com/cfb0271d-de7d-4732-9414-957ca405620b/oauth2/v2.0/token" client-id="9a598195-082a-4d67-99b9-392c6c3e727d" grant-type="client_credentials" scope="https://simego.api.crm4.dynamics.com/.default" thumbprint="84FC24B07BFBCD08F0D5E5B45F" />
	</Authentication>
	<Datasources>
		<Datasource name="accounts">
			<Action name="GetDataSchema">
				<StaticSchemaMap>
					<Column name="accountid" data-type="System.Guid" />
					<Column name="name" data-type="System.String" />
					<Column name="etag" data-type="System.String" />
				</StaticSchemaMap>
			</Action>
			<Action name="GetDataTable">
				<PagingRequest path="value" next="https://instance.api.crm4.dynamics.com/api/data/v9.2/accounts?$select=accountid,name" next-path="$.['@odata.nextLink']">
					<Fetch url="{PagingRequest.Next}">
						<DataTableTransform path="value">
							<ColumnMap path="$.['@odata.etag']" to="etag" />
						</DataTableTransform>
					</Fetch>
				</PagingRequest>
			</Action>
		</Datasource>
	</Datasources>
</Connector>
Writing Back
We have created a few different ways you can write back to the API. Since its likely you might need extra flexibility in how the data is formatted or sent to the API endpoint.
Identifier Column
The first concept to understand is the role of the Identifier Column with Data Sync connectors. These values are attached to the row internally within Data Sync and are a way to maintain the datasource PrimaryKey even when its not part of the Schema Map. By maintaining this Identifier Column value it makes it possible to call UPDATE/DELETE actions on the target by the PrimaryKey value.
To ensure that the Identifier Column is set you need to specify the column from the Datasource which contains the Primary Key value like this within the DataTableTransform element.
<DataTableTransform path="data">
  <IdentifierColumn data-type="System.Int32" path="ProductID" />
</DataTableTransform>
Default Automatic Mode
This is the default no-code option where the data is serialized to JSON and sent to the API endpoints using the URLs and Http Method(s) defined within the Writer element.
<Datasource name="products"> <Action name="GetDataSchema"> <StaticSchemaMap> <Column name="ProductID" data-type="System.Int32" /> <Column name="ProductName" data-type="System.String" /> <Column name="SupplierID" data-type="System.Int32" /> <Column name="CategoryID" data-type="System.Int32" /> <Column name="QuantityPerUnit" data-type="System.String" /> <Column name="UnitPrice" data-type="System.Decimal" /> <Column name="UnitsInStock" data-type="System.Int32" /> <Column name="UnitsOnOrder" data-type="System.Int32" /> <Column name="ReorderLevel" data-type="System.Int32" /> <Column name="Discontinued" data-type="System.Boolean" /> </StaticSchemaMap> </Action> <Action name="GetDataTable"> <PagingRequest start="0" path="data"> <Fetch url="{URL}/ListApi?skip={PagingRequest.Count}&take={PageSize}"> <DataTableTransform path="data"> <IdentifierColumn data-type="System.Int32" path="ProductID" /> </DataTableTransform> </Fetch> </PagingRequest> </Action> <Writer name="Default"> <AddItem method="POST" url="{URL}/ListApi" /> <UpdateItem method="PUT" url="{URL}/ListApi/{Identifier0}" /> <DeleteItem method="DELETE" url="{URL}/ListApi/{Identifier0}" /> </Writer> </Datasource>
For example this mode would send a HTTP response like this when Adding an item to the datasource.
POST http://localhost:2026/ListApi
Content-Type:application/json
Accept:application/json
{"ProductID":74,"ProductName":"Longlife Tofu","SupplierID":4,"CategoryID":7,"QuantityPerUnit":"5 kg pkg.","UnitPrice":10.0,"UnitsInStock":0,"UnitsOnOrder":20,"ReorderLevel":5,"Discontinued":false}
Should the API require the data within another object the you can also specify a single path element via the path attribute.
<Writer name="Default">
	<AddItem method="POST" url="{URL}/ListApi" path="data" />
	<UpdateItem method="PUT" url="{URL}/ListApi/{Identifier0}" path="data"/>
	<DeleteItem method="DELETE" url="{URL}/ListApi/{Identifier0}" />
</Writer>
The Default writer will only include the changed column values in UPDATE actions in the Json Body. If you need to send all the column data again you can configure the writer by setting a mode value of AllColumns this will send all column values as part of the JSON body in the request.
<Writer name="Default">
    <AddItem method="POST" url="{URL}/ListApi" />
    <UpdateItem method="PUT" url="{URL}/ListApi/{Identifier0}" mode="AllColumns" />
    <DeleteItem method="DELETE" url="{URL}/ListApi/{Identifier0}" />
</Writer>
To send only the Key column values from the Schema Mapping as part of the JSON body for UPDATE set the mode to AllKeys.
<Writer name="Default">
    <AddItem method="POST" url="{URL}/ListApi" />
    <UpdateItem method="PUT" url="{URL}/ListApi/{Identifier0}" mode="AllKeys" />
    <DeleteItem method="DELETE" url="{URL}/ListApi/{Identifier0}" />
</Writer>
To send only the Identifier column values set the mode to AllIdentifiers and provide a comma separated list of column names in the identifier-columns attribute to use for the Identifier column values.
<Writer name="Default">
    <AddItem method="POST" url="{URL}/ListApi" />
    <UpdateItem method="PUT" url="{URL}/ListApi/{Identifier0}" mode="AllIdentifiers" identifier-columns="ProductID" />
    <DeleteItem method="DELETE" url="{URL}/ListApi/{Identifier0}" />
</Writer>
Project Automation Callbacks
This mode allows for full control of how the API is called via a C# delegate callback on each item. In this mode we setup the Writer element with a name of Callback and then configure the callback function in Project Automation.
<Datasource name="products"> <Action name="GetDataSchema"> <StaticSchemaMap> <Column name="ProductID" data-type="System.Int32" /> <Column name="ProductName" data-type="System.String" /> <Column name="SupplierID" data-type="System.Int32" /> <Column name="CategoryID" data-type="System.Int32" /> <Column name="QuantityPerUnit" data-type="System.String" /> <Column name="UnitPrice" data-type="System.Decimal" /> <Column name="UnitsInStock" data-type="System.Int32" /> <Column name="UnitsOnOrder" data-type="System.Int32" /> <Column name="ReorderLevel" data-type="System.Int32" /> <Column name="Discontinued" data-type="System.Boolean" /> </StaticSchemaMap> </Action> <Action name="GetDataTable"> <PagingRequest start="0" path="data"> <Fetch url="{URL}/ListApi?skip={PagingRequest.Count}&take={PageSize}"> <DataTableTransform path="data"> <IdentifierColumn data-type="System.Int32" path="ProductID" /> </DataTableTransform> </Fetch> </PagingRequest> </Action> <Writer name="Callback"> <AddItem url="{URL}/ListApi" /> <UpdateItem url="{URL}/ListApi/{Identifier0}" /> <DeleteItem url="{URL}/ListApi/{Identifier0}" /> </Writer> </Datasource>
Within the Start() method we setup the callback methods for ADD/UPDATE/DELETE. These will then be called during the synchronisation process for you to call the API.
For convince we pass you an object for calling HTTP methods the HttpWebRequestHelper with any authentication headers set and within the ProjectAutomationItemInfo object we have the target URL in the Target property.
The Data property contains a Dictionary<string, object> of the data converted to match the target schema.
Therefore a simple implementation which would match the Default mode would be implemented like this.
public override void Start()
{
	DataSourceB.SetWriterCallback(AddItem, UpdateItem, DeleteItem);
}

public void AddItem(HttpWebRequestHelper helper, ProjectAutomationItemInfo info)
{
	helper.PostRequestAsJson(info.Data, info.Target);
}

public void UpdateItem(HttpWebRequestHelper helper, ProjectAutomationItemInfo info)
{
	helper.PutRequestAsJson(info.Data, info.Target);
}

public void DeleteItem(HttpWebRequestHelper helper, ProjectAutomationItemInfo info)
{
	helper.DeleteRequestAsJson(null, info.Target);
}
Project Automation Batch Callback
Requires Data Sync Version 6.0.3398
This mode allows for full control of how the API is called in batches via a C# delegate callback on each batch of items. In this mode we setup the Writer element with a name of BatchCallback and then configure the callback functions in Project Automation.
In this example the API expects an Array of items like this below. Therefore we will need to wrap the array of results into an anonymous object to add the items element.
{
    "items": [
        { ... },
        { ... }
    ]
}
Since we need to include the item identifier in the body of the request rather than the URL we use the mode option of AllIdentifiers to ensure that the items ID is included in UPDATE and DELETE operations.
To Adjust the size of the Batch include a Parameter named UpdateBatchSize where you can specify the size of each batch of items.
<Connector name="Simego Web API Connector" description="Connect to Simego Web API" version="1.0"> <Parameters> <Parameter name="URL" value="http://localhost:8080" /> <Parameter name="PageSize" value="10" /> <Parameter name="UpdateBatchSize" value="10" /> </Parameters> <Datasources> <Datasource name="Products"> <Action name="GetDataSchema"> <StaticSchemaMap> <Column name="ProductID" data-type="System.Int32" /> <Column name="ProductName" data-type="System.String" /> <Column name="SupplierID" data-type="System.Int32" /> <Column name="CategoryID" data-type="System.Int32" /> <Column name="QuantityPerUnit" data-type="System.String" /> <Column name="UnitPrice" data-type="System.Decimal" /> <Column name="UnitsInStock" data-type="System.Int32" /> <Column name="UnitsOnOrder" data-type="System.Int32" /> <Column name="ReorderLevel" data-type="System.Int32" /> <Column name="Discontinued" data-type="System.Boolean" /> </StaticSchemaMap> </Action> <Action name="GetDataTable"> <PagingRequest path="data" start="1" next-path="nextpage"> <Fetch url="{URL}/app/list/{Datasource.Name}?limit={PageSize}&page={PagingRequest.Page}"> <DataTableTransform path="data"> <IdentifierColumn data-type="System.Int32" path="WS_ID" /> </DataTableTransform> </Fetch> </PagingRequest> </Action> <Writer name="BatchCallback"> <AddItem url="{URL}/app/list/{Datasource.Name}" /> <UpdateItem url="{URL}/app/list/{Datasource.Name}" mode="AllIdentifiers" identifier-columns="WS_ID" /> <DeleteItem url="{URL}/app/list/{Datasource.Name}" mode="AllIdentifiers" identifier-columns="WS_ID" /> </Writer> </Datasource> </Datasources> </Connector>
public override void Start()
{
	DataSourceB.SetWriterBatchCallback(AddItem, UpdateItem, DeleteItem);
}

public void AddItem(HttpWebRequestHelper helper, ProjectAutomationBatchInfo info)
{
	helper.PostRequestAsJson(new { items = info.Data }, info.Target);
}

public void UpdateItem(HttpWebRequestHelper helper, ProjectAutomationBatchInfo info)
{
	helper.PutRequestAsJson(new { items = info.Data }, info.Target);
}

public void DeleteItem(HttpWebRequestHelper helper, ProjectAutomationBatchInfo info)
{
	helper.DeleteRequestAsJson(new { items = info.Data }, info.Target);
}
Since we are processing items in Batch this mode does not support Project Automation Item events. If you need to do further processing we would suggest you do that in the callback function instead.
Conclusion
In closing we hope you will be able to see how easy it will be to connect to JSON style APIs with Data Sync and this new connector.