Advanced: Building a Custom Data Sync Connector
How to use Visual Studio to build and debug a custom Data Sync Data Connector
What is a Custom Connector?
A Data Sync custom connector is compiled connector built with .NET Framework and C# and this gives you full control to build the connector and is typically used in more advanced scenarios. Examples of custom connectors might be the SharePoint and Dynamics CRM connectors, as these are complex and not something which can be built with a simple markup description. By building a connector for Data Sync you can leverage all of the Data Sync features, have the full debugging experience with F5 run and the ability to step through your code with Visual Studio.
What do you need?
To build a custom connector you will need a licensed copy of Data Synchrionisation Studio and either Visual Studio 2022 or Rider .NET Framework Development Environment.
How do Custom Connectors work?
Custom Data Sync connectors are loaded at runtime by Data Sync and we use .NET reflection to find meta-data about the connector. After this we use the Interfaces IDataSourceReader and IDataSourceWriter to call methods on the connector.
The classes DataReaderProviderBase and DataWriterProviderBase provide a quicker implementation as they handle most of the default behavior and you only need to implement a few methods.
For example a basic read-only custom connector we need to implement the following methods when inheriting from DataReaderProviderBase: GetDefaultDataSchema, GetDataTable, GetInitializationParameters and Initialize methods.
GetDefaultDataSchema- return the schema for the connector i.e. the columns and data types for the table.GetDataTable- return a table of data based on the configuredSchemaMap.GetInitializationParameters- return a list of configuration parameters to save in the project file.Initialize- Load the connector configuration from a list of parameters stored in the project file.
Building a basic Data Sync connector
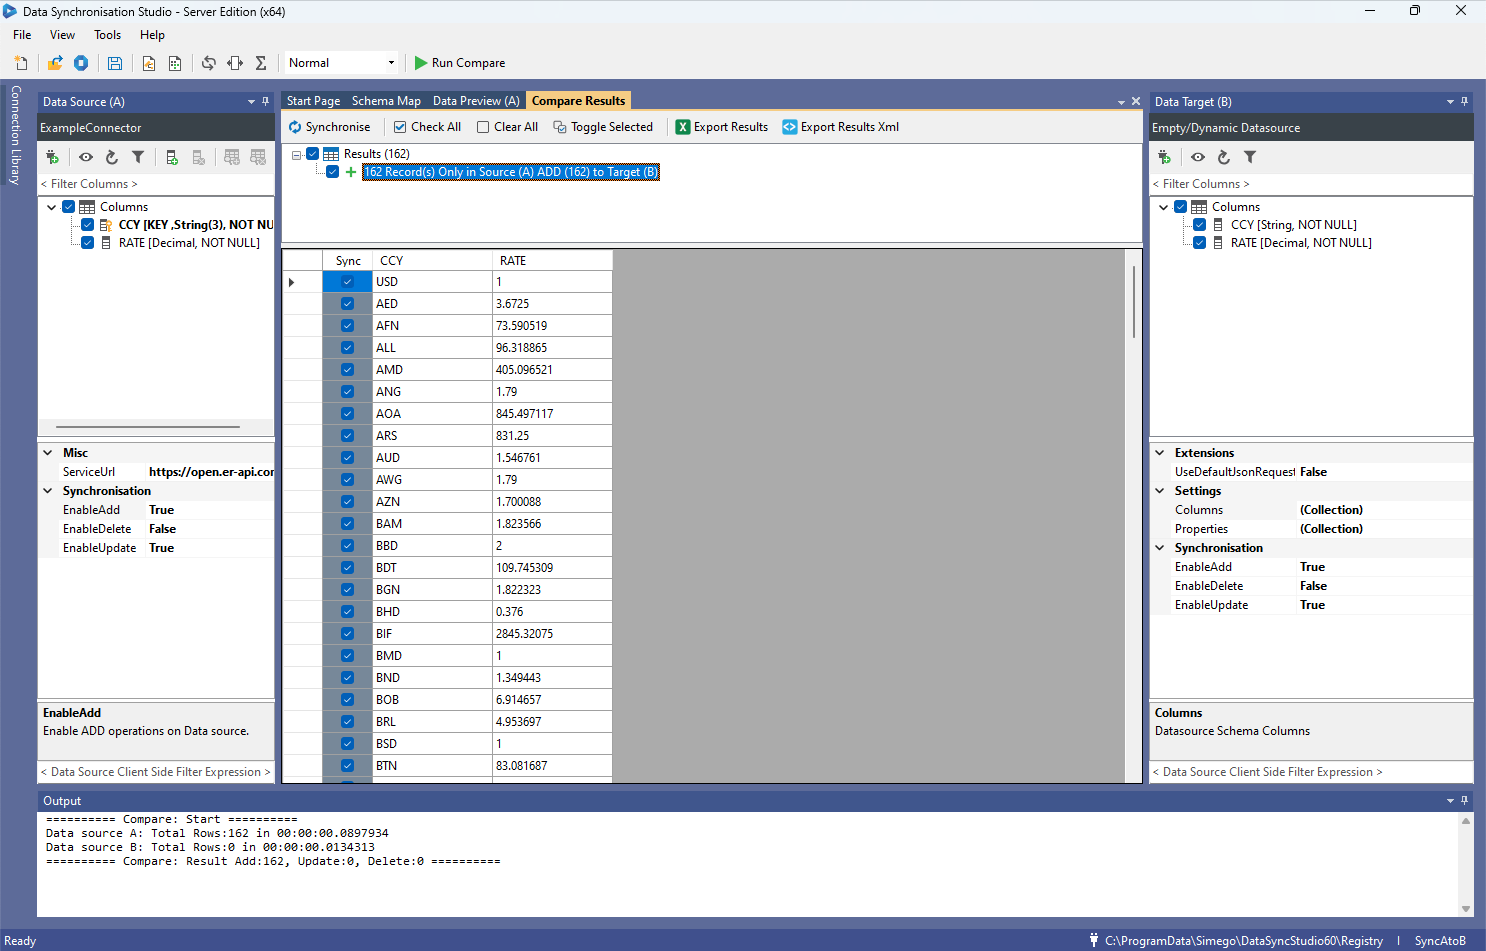
In the example below we create a basic custom connector that downloads currency exchange rates from https://open.er-api.com/v6/latest/USD and converts the results in to a DataTable with the columns CCY and RATE.
First we define a configuration property for the Url we need to call. Public properties exposed on the class will be shown in the Data Sync property grid.
public string ServiceUrl { get; set; } = "https://open.er-api.com/v6/latest/USD";
Next we have methods to Load and Save the configuration properties so we can save the project. Initialize is called to load the configuration and GetInitializationParameters is called to save the configuration.
//Load the Provider Settings from the File.
public override void Initialize(List<ProviderParameter> parameters)
{
    foreach (ProviderParameter p in parameters)
    {
        if(p.Name == nameof(ServiceUrl))
        {
            ServiceUrl = p.Value;
        }
    }
}

//Return the Provider Settings so we can save the Project File.
public override List<ProviderParameter> GetInitializationParameters()
{
    return new List<ProviderParameter>
                {
                    new ProviderParameter(nameof(ServiceUrl), ServiceUrl)
                };
}
Then we need to let Data Sync know what columns this data source exposes. In GetDefaultDataSchema we return a DataSchema object with a list of columns in the Map property which represents the data source schema.
//Return the Data source default Schema.
public override DataSchema GetDefaultDataSchema()
{
    DataSchema schema = new DataSchema();

    schema.Map.Add(new DataSchemaItem("CCY", typeof(string), true, false, false, 3));
    schema.Map.Add(new DataSchemaItem("RATE", typeof(decimal), false, false, false, -1));

    return schema;
}
Finally we need to return the data by filling the passed DataTable (dt) with rows based on the configured SchemaMap.
The SchemaMap defines a column mapping of ColumnA -> ColumnName <- ColumnB, therefore depending which side your connected to the map can be different.
We can use DataSchemaMapping to help with this column mapping to map columns to the source name.
Further to this by using a callback function on the dt.Rows.Add method we can make it easier by just returning the column value for each column asked for in the callback.
// Return Table of Results.
public override DataTableStore GetDataTable(DataTableStore dt)
{
    var helper = new HttpWebRequestHelper();
    var response = helper.GetRequestAsJson(ServiceUrl);

    var mapping = new DataSchemaMapping(SchemaMap, Side);
    var columns = SchemaMap.GetIncludedColumns();

    //Loop around your data adding it to the DataTableStore dt object.
    foreach (JProperty item_row in response["rates"])
    {
        dt.Rows.Add(mapping, columns,
            (item, columnName) =>
            {
                if (columnName == "CCY") return item_row.Name;
                if (columnName == "RATE") return item_row.ToObject<decimal>();
                return null;
            });
    }

    return dt;
}
Putting it all together
If we put all this together in a Data Connector class it would look like this.
using Newtonsoft.Json.Linq;
using Simego.DataSync;
using Simego.DataSync.Providers;
using System.Collections.Generic;

namespace ExampleConnector
{
    [ProviderInfo(Name = "ExampleConnector", Description = "ExampleConnector Description")]
    public class ExampleConnectorDatasourceReader : DataReaderProviderBase
    {
        public string ServiceUrl { get; set; } = "https://open.er-api.com/v6/latest/USD";

        // Return Table of Results.
        public override DataTableStore GetDataTable(DataTableStore dt)
        {
            var helper = new HttpWebRequestHelper();
            var response = helper.GetRequestAsJson(ServiceUrl);

            var mapping = new DataSchemaMapping(SchemaMap, Side);
            var columns = SchemaMap.GetIncludedColumns();

            //Loop around your data adding it to the DataTableStore dt object.
            foreach (JProperty item_row in response["rates"])
            {
                dt.Rows.Add(mapping, columns,
                    (item, columnName) =>
                    {
                        if (columnName == "CCY") return item_row.Name;
                        if (columnName == "RATE") return item_row.ToObject<decimal>();
                        return null;
                    });
            }

            return dt;
        }

        //Return the Data source default Schema.
        public override DataSchema GetDefaultDataSchema()
        {
            DataSchema schema = new DataSchema();

            schema.Map.Add(new DataSchemaItem("CCY", typeof(string), true, false, false, 3));
            schema.Map.Add(new DataSchemaItem("RATE", typeof(decimal), false, false, false, -1));

            return schema;
        }

        //Return the Provider Settings so we can save the Project File.
        public override List<ProviderParameter> GetInitializationParameters()
        {
            return new List<ProviderParameter>
                       {
                            new ProviderParameter(nameof(ServiceUrl), ServiceUrl)
                       };
        }

        //Load the Provider Settings from the File.
        public override void Initialize(List<ProviderParameter> parameters)
        {
            foreach (ProviderParameter p in parameters)
            {
                if(p.Name == nameof(ServiceUrl))
                {
                    ServiceUrl = p.Value;
                }
            }
        }
    }
}
Example Connector loaded in the Data Sync Designer
Once this has been built and loaded into Data Sync, you can build a project to use it like the image below.
Getting Started
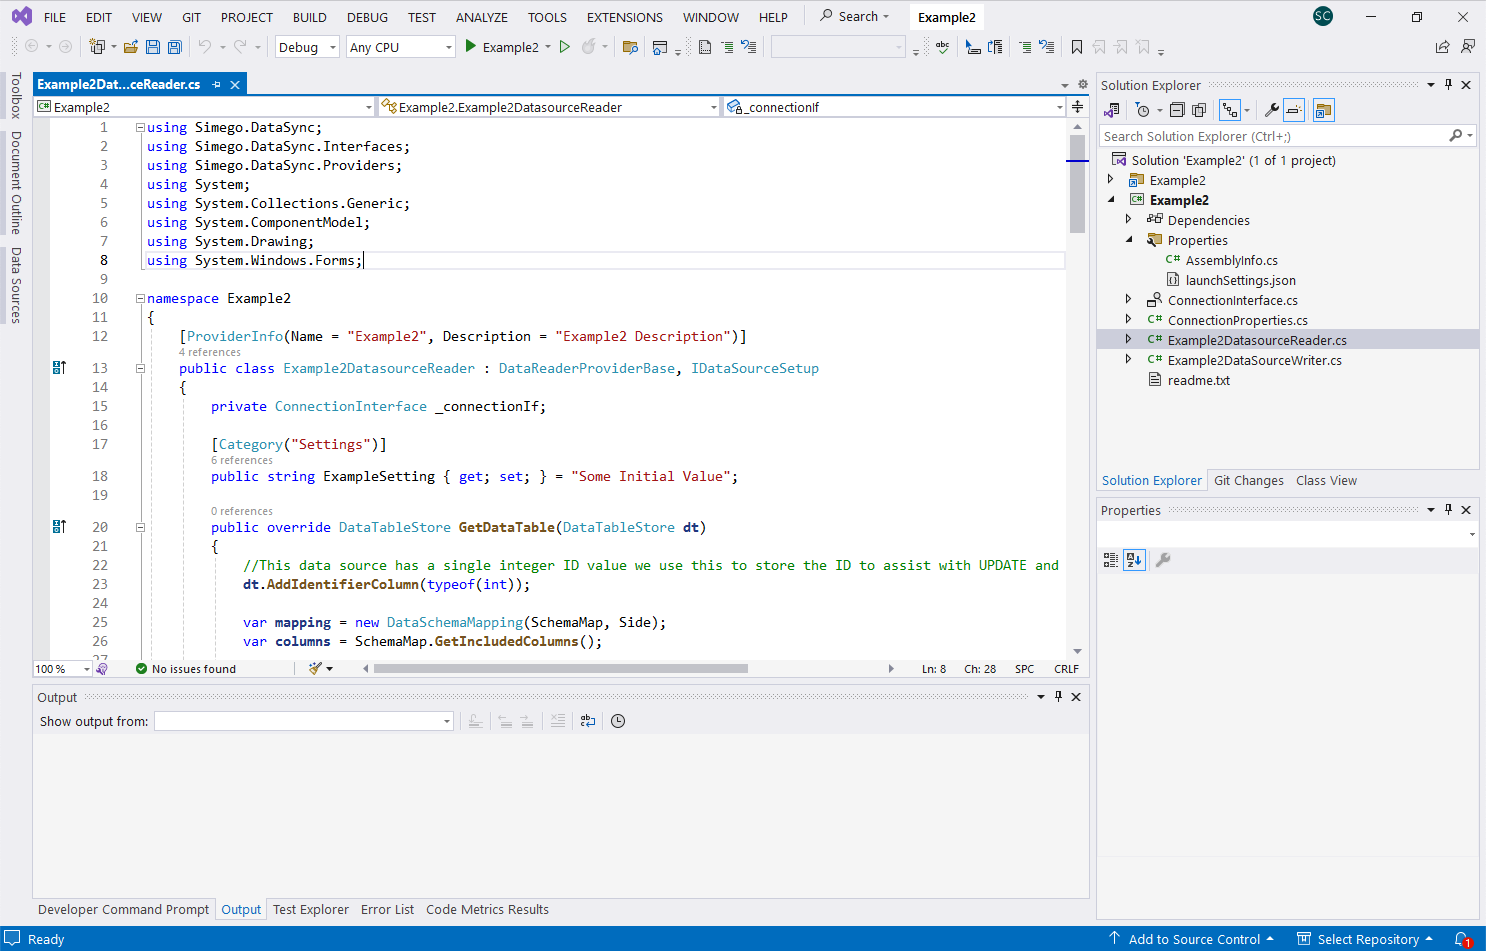
To get started with your own connector we have created a function in DataSync to create a default project for you. To get to this go to Tools > Create Data Provider VS Project, which will open a window where you can define the assembly name and output path.
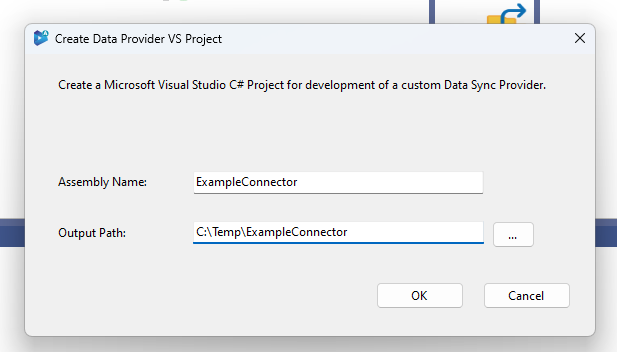
Clicking OK will create a Visual Studio Project for a new connector configured ready to start your development.
For connector development you need a reference to Simego.DataSync.Core.dll from the Data Sync install directory and if your going to use the HttpWebRequestHelper you will also need to add a Nuget package reference to Newtonsoft.Json version 13.0.3.
To be able to debug your project in Visual Studio the project needs to be configured to start an external program which is the Data Sync Designer from the install directory i.e. "C:\Program Files\Simego\Data Synchronisation Studio 6.0\Simego.DataSync.Studio.exe" and you need to pass the command line parameter -debug.
When you run your project from Visual Studio it will start Data Sync and Data Sync will look in the Visual Studio output directory for connectors and load them from the folder ready to debug your code.
Identifier Columns
The first concept to understand is the role of the Identifier Column with Data Sync connectors. These values are attached to the row internally within Data Sync and are a way to maintain the data source PrimaryKey even when its not part of the Schema Map. By maintaining this Identifier Column value it makes it easier to handle UPDATE/DELETE actions on the target by the PrimaryKey value.
If your connector is going to be read-only then Identifier Columns are not necessary.
During the call to GetDataTable you can add Identifier Columns once only. After you add Identifier Columns you must add the rows to the Data Table with the method call AddWithIdentifier
public override DataTableStore GetDataTable(DataTableStore dt)
{
    //This data source has a single integer ID value we use this to store the ID to assist with UPDATE and DELETE actions.
    dt.AddIdentifierColumn(typeof(int));

    var mapping = new DataSchemaMapping(SchemaMap, Side);
    var columns = SchemaMap.GetIncludedColumns();

    // Returns a basic Dictionary with some data you would replace this with calls to your target system to get the data.
    var result = TestData();

    //Loop around your data adding it to the DataTableStore dt object.
    foreach (var item_row in result)
    {
        dt.Rows.AddWithIdentifier(mapping, columns,
            (item, columnName) =>
            {
                return item_row[columnName];
            }
            , item_row["item_id"]);
    }

    return dt;
}
Now within your writer class it is easy to get the identifier value for a row to be used with UPDATE and DELETE actions.
Custom Configuration UI
You can provide a custom UI component to be displayed in the Data Sync connection dialog. This is used to assist in creating the connection and is especially useful if you need to guide the user or choose different data sources to connect to.
To use a custom UI component your connector must implement the IDataSourceSetup interface.
public interface IDataSourceSetup
{
    void DisplayConfigurationUI(IntPtr parentHwnd);
    IDataSourceReader GetReader();
    bool Validate();
}
DisplayConfigurationUIis called when we show the UI component it will pass a handle to the parent window where you can add your control.Validate()is called when the user clicks the OK button in the connection dialog. Here you can throw an exception to the user or return true to the accept the configuration settings.GetReader()is then called to return an instance of the configured DataSource Reader. Typically this is justthis.
Below is an example which loads a ConnectionInterface form which contains a PropertyGrid control, and is then loaded into the connection dialog.
public void DisplayConfigurationUI(IntPtr parent)
{
    var parentControl = Control.FromHandle(parent);

    if (_connectionIf == null)
    {
        _connectionIf = new ConnectionInterface();
        _connectionIf.PropertyGrid.SelectedObject = new ConnectionProperties(this);
    }

    _connectionIf.Font = parentControl.Font;
    _connectionIf.Size = new Size(parentControl.Width, parentControl.Height);
    _connectionIf.Location = new Point(0, 0);
    _connectionIf.Dock = DockStyle.Fill;

    parentControl.Controls.Add(_connectionIf);
}

public bool Validate() => true;

public IDataSourceReader GetReader() => this;
The ConnectionProperties class is used here to create a wrapper around the reader object to expose the configuration properties to display in the PropertyGrid control.
class ConnectionProperties
{
    private readonly ExampleDatasourceReader _reader;

    [Category("Settings")]
    public string ExampleSetting { get { return _reader.ExampleSetting; } set { _reader.ExampleSetting = value; } }

    public ConnectionProperties(ExampleDatasourceReader reader)
    {
        _reader = reader;
    }
}
Lookups
To support Lookup functions (LOOKUPA and LOOKUPB) in Data Sync you need to implement the interface IDataSourceLookup. This requires that you return a DataTable of results based on the Lookup configuration.
public interface IDataSourceLookup
{
    DataTableStore GetLookupTable(DataLookupSource source, List<string> columns);
}
Here is an example of a Lookup implementation. This method would be called when a user uses calculated columns with an expression like this.
LOOKUPA("supplierid", "suppliers", WHEN("companyname", value))
What you do is create a new instance of your connector and set the appropriate properties from your current instance. In this case we need to copy the database connection string.
DataLookupSource contains parameters passed by the user. So really in the example below we are looking to change the SourceTable property to the name passed in the source (suppliers).
You then create a default schema map including only the columns from the columns list ("supplierid", "companyname") and fill and return the DataTable.
public DataTableStore GetLookupTable(DataLookupSource source, List<string> columns)
{
    var reader = new SqlDataSourceReader
                        {
                            ConnectionString = ConnectionString,
                            CommandTimeout = CommandTimeout,
                            SourceTable = source.Config.ContainsKey("SourceTable") ? source.Config["SourceTable"] : source.Name
                        };

    reader.Initialize(SecurityService);

    var defaultSchema = reader.GetDefaultDataSchema();
    reader.SchemaMap = new DataSchema();

    foreach (var dsi in defaultSchema.Map)
    {
        foreach (var column in columns)
        {
            if ( dsi.ColumnName.Equals(column, StringComparison.OrdinalIgnoreCase))
                reader.SchemaMap.Map.Add(dsi.Copy());
        }
    }

    return reader.GetDataTable();
}
Connection Library
The connection library is used to store connection configuration which can be updated to maintain the connection. This is typically endpoints, username and passwords. These are then stored separate from the project file in either the local library on disk or the Ouvvi library in the Ouvvi database.
To support the connection library you need to implement the interface IDataSourceRegistry
public interface IDataSourceRegistry
{
    string RegistryKey { get; set; }
    void InitializeFromRegistry(IDataSourceRegistryProvider provider);
    List<ProviderParameter> GetRegistryInitializationParameters();
    object GetRegistryInterface();
}
RegistryKey- The name of the connection library entry. This must be managed by the default methodsInitializeandGetInitializationParametersso that this key is set during project load and saved when you save the project.InitializeFromRegistry- Used to Initialize your connector from settings stored in the connection library.GetRegistryInitializationParameters- Returns the connection parameters to store in the connection library.GetRegistryInterface- Returns a version of the connector where you can hide the connection library parameters from the default Data Sync UI.
public void InitializeFromRegistry(IDataSourceRegistryProvider provider)
{
    var registry = provider.Get(RegistryKey);
    if (registry != null)
    {
        foreach (ProviderParameter p in registry.Parameters)
        {
            if(p.Name == nameof(ServiceUrl))
            {
                ServiceUrl = p.Value;
            }
        }
    }
}
TIP: If you need to update the connection library at runtime, save a reference to the
IDataSourceRegistryProviderso you can write back to the library later.
public List<ProviderParameter> GetRegistryInitializationParameters()
{
    return new List<ProviderParameter>
                {
                    new ProviderParameter(nameof(ServiceUrl), ServiceUrl)
                };

}
GetRegistryInterface requires a new class which wraps your connector to expose only those parameters which can be changed.
For example you can use the helper base class DataReaderRegistryView<T> and then add the properties to the class you want to be available in the data source property grid like this.
public class ExampleConnectorDatasourceReaderWithRegistry : DataReaderRegistryView<ExampleConnectorDatasourceReader>
{
    [ReadOnly(true)]
    public string ServiceUrl => _reader.ServiceUrl;

    public ExampleConnectorDatasourceReaderWithRegistry(ExampleConnectorDatasourceReader reader) : base(reader)
    {

    }
}
Then return and instance of this class on a call to GetRegistryInterface.
object GetRegistryInterface() => new ExampleConnectorDatasourceReaderWithRegistry(this);
Connection Library Server Explorer
If your connector can return multiple data sources i.e Tables in a Database then you can implement the Connection Library Server Explorer. This allows for quick connection directly from the TreeView and lists the available data sources.
To do this you need to implement the IDataSourceRegistryView interface.
public interface IDataSourceRegistryView
{
    RegistryConnectionInfo GetRegistryConnectionInfo();
    RegistryViewContainer GetRegistryViewContainer(string parent, string id, object state);
    object GetRegistryViewConfigurationInterface();
}
GetRegistryConnectionInfo- returns meta data about this connection i.e name and icon.GetRegistryViewContainer- return the Folder and items list to display in the TreeView.GetRegistryViewConfigurationInterface- currently unused and should return null.
Below is a simple implementation of the IDataSourceRegistryView interface to return a Folder List to display in the TreeView.
Within the RegistryFolderType the ParameterName represents the configuration property name which will receive the object name from the list in the TreeView. In this example "Item 1" and "Item 2".
public RegistryConnectionInfo GetRegistryConnectionInfo()
{
    return new RegistryConnectionInfo {
        GroupName = "Example Provider",
        ConnectionGroupImage = RegistryImageEnum.Folder,
        ConnectionImage = RegistryImageEnum.Folder
    };
}

public RegistryViewContainer GetRegistryViewContainer(string parent, string id, object state)
{
    var folder = new RegistryFolderType
    {
        DataType = InstanceHelper.GetTypeNameString(GetType()),
        Image = RegistryImageEnum.Table,
        Preview = true,
        ParameterName = nameof(Table))
    };

    folder.AddFolderItems(new string [] { "Item 1", "Item 2" });

    return new RegistryViewContainer(folder, null);
}

public object GetRegistryViewConfigurationInterface() => null;
You can add multiple folders and they can be lazy loaded. This GetRegistryViewContainer method would be called multiple times as the user expands the tree whilst passing the parent folder name.
Writing Back
To create a connector which can write back to your data source you need to create a new class which implements IDataSourceWriter or ideally derives from DataWriterProviderBase. You then implement the methods AddItems, UpdateItems and DeleteItems.
Within your reader you return an instance of this class in the GetWriter whilst setting the SchemaMap property.
public override IDataSourceWriter GetWriter()
{
    return new ExampleConnectorDatasourceWriter {SchemaMap = SchemaMap};
}
Within the DataWriter class the Execute method is called during the write operation and its up to you how you process this. Typically you would call each of the methods AddItems, UpdateItems and DeleteItems.
public override void Execute(List<DataCompareItem> addItems, List<DataCompareItem> updateItems, List<DataCompareItem> deleteItems, IDataSourceReader reader, IDataSynchronizationStatus status)
{
    //Process the Changed Items
    if (addItems != null && status.ContinueProcessing) AddItems(addItems, status);
    if (updateItems != null && status.ContinueProcessing) UpdateItems(updateItems, status);
    if (deleteItems != null && status.ContinueProcessing) DeleteItems(deleteItems, status);
}
An example implementation for AddItems might look like the code below, where you would fill in the code in the TODO: section to write the data to the target to create a new record from the data in the targetItem dictionary object.
These examples also handle hooks for Project Automation Item events. If you do not plan to support those then the code can be simplified by removing the Automation Hooks.
public override void AddItems(List<DataCompareItem> items, IDataSynchronizationStatus status)
{
    if (items != null && items.Count > 0)
    {
        int currentItem = 0;

        foreach (var item in items)
        {
            if (!status.ContinueProcessing)
                break;

            try
            {
                var itemInvariant = new DataCompareItemInvariant(item);

                //Call the Automation BeforeAddItem (Optional only required if your supporting Automation Item Events)
                Automation?.BeforeAddItem(this, itemInvariant, null);

                if (itemInvariant.Sync)
                {
                    //Get the Target Item Data
                    Dictionary<string, object> targetItem = AddItemToDictionary(Mapping, itemInvariant);

                    //TODO: Write the code to Add the Item to the Target

                    //Call the Automation AfterAddItem (pass the created item identifier if possible)
                    Automation?.AfterAddItem(this, itemInvariant, null);

                }

                ClearSyncStatus(item); //Clear the Sync Flag on Processed Rows

            }
            catch (SystemException e)
            {
                HandleError(status, e);
            }
            finally
            {
                status.Progress(items.Count, ++currentItem); //Update the Sync Progress
            }

        }
    }
}
For UpdateItems its slightly different. We use a call to GetTargetIdentifier<T> to get the identifier value of the row we want to update. This time the targetItem dictionary object only contains those columns which were changed and you need to fill in the code in the TODO: section to write the data to the target.
public override void UpdateItems(List<DataCompareItem> items, IDataSynchronizationStatus status)
{
    if (items != null && items.Count > 0)
    {
        int currentItem = 0;

        foreach (var item in items)
        {
            if (!status.ContinueProcessing)
                break;

            try
            {
                var itemInvariant = new DataCompareItemInvariant(item);

                //Example: Get the item ID from the Target Identifier Store
                var item_id = itemInvariant.GetTargetIdentifier<int>();

                //Call the Automation BeforeUpdateItem (Optional only required if your supporting Automation Item Events)
                Automation?.BeforeUpdateItem(this, itemInvariant, item_id);

                if (itemInvariant.Sync)
                {
                    //Get the Target Item Data
                    Dictionary<string, object> targetItem = UpdateItemToDictionary(Mapping, itemInvariant);

                    //TODO: Write the code to Update the Item in the Target using item_id as the Key to the item.

                    //Call the Automation AfterUpdateItem
                    Automation?.AfterUpdateItem(this, itemInvariant, item_id);
                }

                ClearSyncStatus(item); //Clear the Sync Flag on Processed Rows
            }
            catch (SystemException e)
            {
                HandleError(status, e);
            }
            finally
            {
                status.Progress(items.Count, ++currentItem); //Update the Sync Progress
            }

        }
    }
}
Finally for DeleteItems, we can usually just delete the item with the Identifier value.
public override void DeleteItems(List<DataCompareItem> items, IDataSynchronizationStatus status)
{
    if (items != null && items.Count > 0)
    {
        int currentItem = 0;

        foreach (var item in items)
        {
            if (!status.ContinueProcessing)
                break;

            try
            {
                var itemInvariant = new DataCompareItemInvariant(item);

                //Example: Get the item ID from the Target Identifier Store
                var item_id = itemInvariant.GetTargetIdentifier<int>();

                //Call the Automation BeforeDeleteItem (Optional only required if your supporting Automation Item Events)
                Automation?.BeforeDeleteItem(this, itemInvariant, item_id);

                if (itemInvariant.Sync)
                {
                    //TODO: Write the Code to Delete the Item in the Target using item_id as the Key to the item.

                    //Call the Automation AfterDeleteItem
                    Automation?.AfterDeleteItem(this, itemInvariant, item_id);
                }

                ClearSyncStatus(item); //Clear the Sync Flag on Processed Rows
            }
            catch (SystemException e)
            {
                HandleError(status, e);
            }
            finally
            {
                status.Progress(items.Count, ++currentItem); //Update the Sync Progress
            }

        }
    }
}
Incremental Data Load
To support Incremental Data Load you need to set SupportsIncrementalReconciliation=true in the constructor and implement the method GetDataTable(DataTableStore dt, DataTableKeySet keyset).
In Incremental mode we pass a list of keys (keyset) that are the unique key values of the loaded source connection. In response you need to return a DataTable of the rows with matching keys, each key is expected to be unique and return only 1 result.
Packaging and Deployment
To package your connector for deployment you need to compile your connector and compress the required components (typically just your .dll file) into a zip archive file.
You can then use the File > Install Data Connector feature in Data Sync to install the connector into the DataSync custom connector library.
Here is an example bat file script which you could use to compile and package into a zip archive.
set p=ExampleConnector
"C:\Program Files\Microsoft Visual Studio\2022\Enterprise\MSBuild\Current\Bin\msbuild.exe" /t:Build /p:Configuration=Release /p:NoWarn=1591
rmdir ..\dist\ /S /Q
mkdir ..\dist\files\%p%
xcopy ..\src\%p%\bin\Release\net48\*.* ..\dist\files\%p%\*.* /y
cd ..\dist\files\
del .\%p%\Simego.DataSync.Core.dll
tar.exe -acf ..\%p%.zip *.*
cd ..\..\src
NOTE: During development you must not have the connector in both places. So if your currently developing your connector make sure to delete it from the Data Sync connector library.
Further Information
You can checkout some of our open-source connectors in our GitHub repository here github.com/simego-ltd for more ideas.