Integrating with Salesforce
With Data Sync you can quickly and easily import and export data to and from your Salesforce objects.
Below we cover importing contact records into the contact object from a SQL table, and then we cover how to export the Salesforce account object into a SQL table.
Although we use the example of a SQL table in this article, you can use any of the available connectors to import and export data. If there is not currently a connector for your system then you can always build a custom connector.
Note that when designing your integration with Salesforce you need to think about the relationship between objects. There may be relational fields that are dependant on values being added in another object first before they can be used in the one your project is updating.
For example the contact object has the Account ID which links it to the account object. If you try to add a contact for an account that doesn't exist in the account object then it is likely to fail. To get around this issue you should make sure that the account object is updated before the contact object.

Contents
- Requirements
- Importing Data into Salesforce
- Connect to your Source Data
- Connect to Salesforce
- Map the Source & Target Columns
- Preview the Results and Sync
- Exporting Data from Salesforce
- Connect to Salesforce
- Connect to your SQL Table
- Map the Source & Target Columns
- Preview the Results and Sync
- Additional Options
Requirements
Before getting started you need to ensure you have the following:
- Windows 10 or Windows Server
- Downloaded & Installed Data Synchronisation Studio
- Access to Salesforce
- A dataset to connect to
- Access to a SQL table, or another system to export your data to.
If you do not have Data Synchronisation Studio you can get a free evaluation edition.
Importing Data into Salesforce
You can quickly and easily synchronise your business data into Salesforce when you use Data Synchronisation Studio. The example below connects to a SQL table with contact records that need to be imported into Salesforce and linked to an account. The account records have already been synchronised prior to this.
Although we use a SQL table in this example you could use any of the other connectors as your source. This might be Active Directory, a SharePoint List, a CSV file or a Dynamics Entity to mention a few. Just select the connector you need, enter the required connection details and you're ready to go.
Connect to your Source Data
In this example we have a handful of contacts in a SQL table that we want to get into a Salesforce Contact object.
To do this we need to start by connecting our Source window to our SQL table. To do this click onto Connect Datasource to open the connection window. Then navigate to SQL Database > Microsoft SQL Server (SQL Client).
Enter in the network name of your SQL Server, any credentials you might need to connect and set encryption or trusted certificate as required.
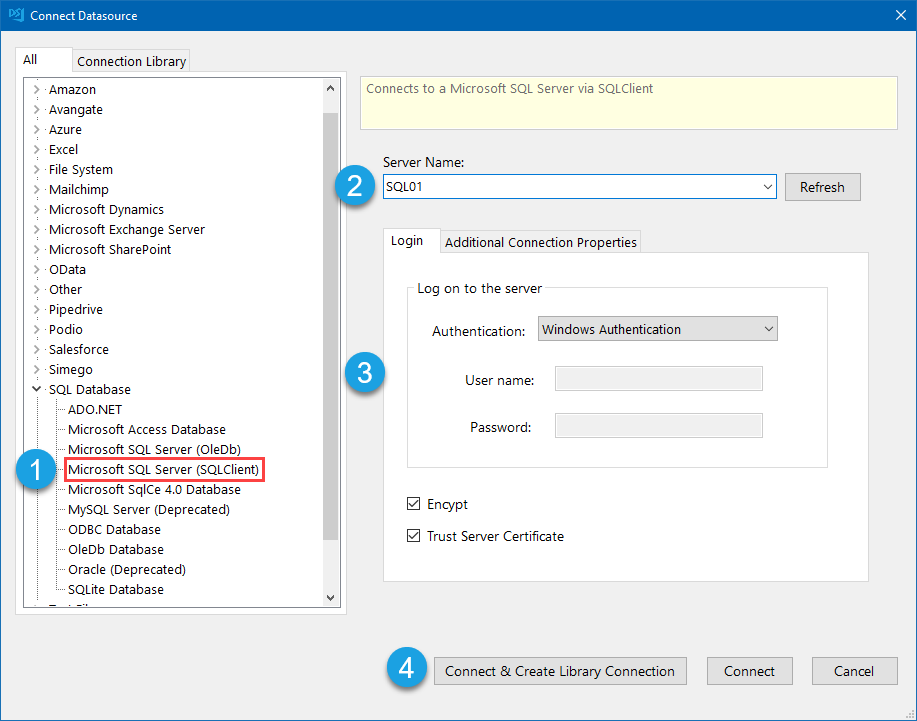
Click Connect & Create Library Connections to save this database connection to the connection library. This only needs to be done once per database and will make future project setup easier.
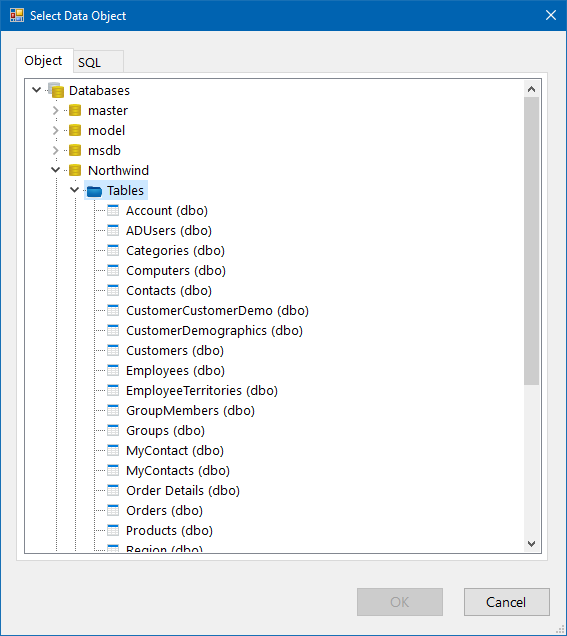
Select the database and table from the tree view to connect to, and if you are saving to the connection library another window will open where you need to enter a name in for the connection.
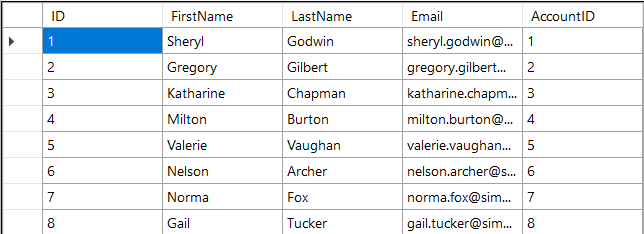
This will load the columns in your SQL table into the source window.
Connect to your Salesforce Object
To connect to Salesforce in Data Sync you need to have first configured the app registration in Salesforce so then you have all the details needed to connect via OAuth.
You will need the redirect URL port number for your app registration which can be found in the connection window of Data Sync. To get to this click onto the target window and then go to Salesforce > Salesforce Object.
Once you have configured the app in Salesforce you can now enter the Consumer Key and Consumer Secret into the connection window in Data Sync and click Authorize Connection to validate the app details.
If the authorisation is successful you will be able to select an object to connect to from the object name dropdown list.
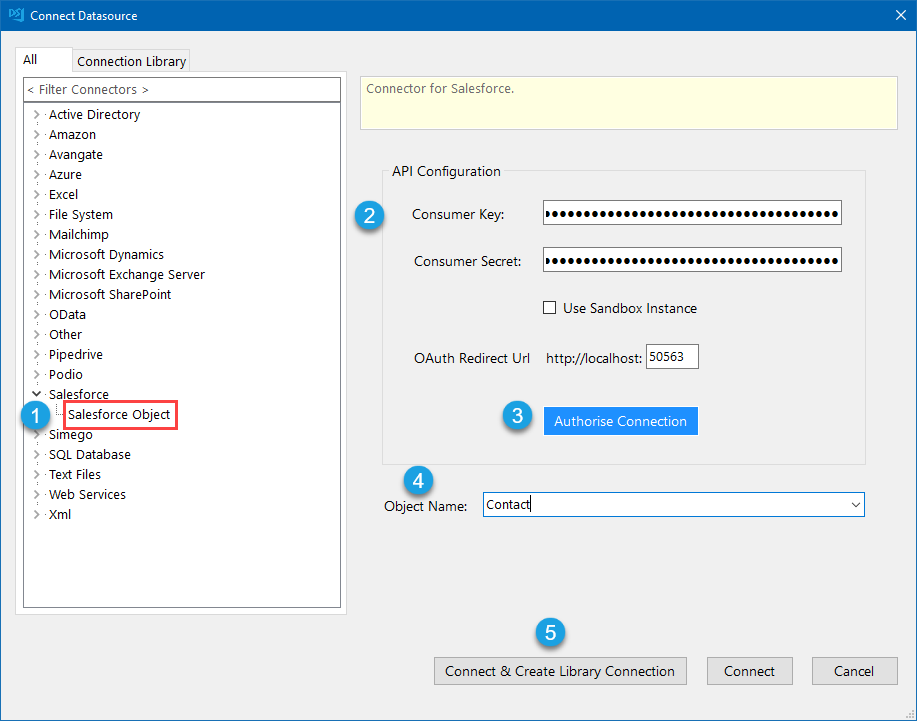
Click Connect & Create Library Connection to save the connection to the connection library. This only needs to be done once per site as you will be able to access the other objects from the connection library.
If you have already saved your connection to the connection library then you can expand the connection and select the object you want to connect to.

Map the Source & Target Columns
You now need to configure the schema map so that the source columns are mapped to their corresponding column in Salesforce. Make sure that the data types are correct and that you have selected a unique key column that can be used to identify each record.

If your source data doesn't have the Salesforce Account ID then you can do a lookup based on the internal account number.
Lookup Account Number
In order to write to the account number column in salesforce you need to return the correct salesforce id for the account. If you have synchronised your internal account id's to the account number column within the salesforce account object then you can do a lookup to return the correct account id so that salesforce links the contact to the account.
Just drag the account object from the connection library onto your account number column to create the lookup, and configure the connection to use the account number column to match the values.
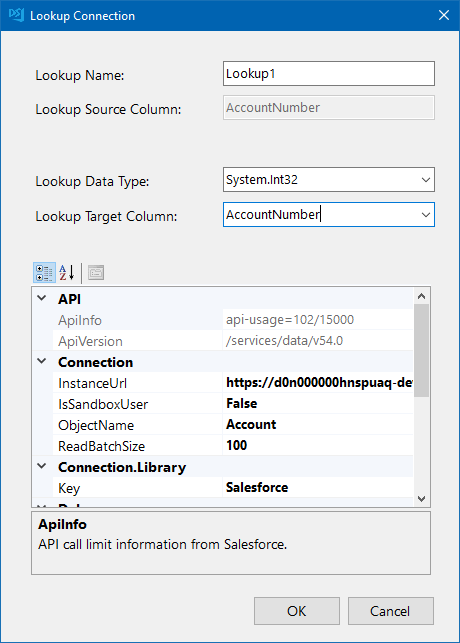
You can then map the id column returned by salesforce to the lookup account id column.

Preview the Results and Sync
Once the mapping is complete you can click Compare A > B to preview the changes that need to be made. Here you can preview additions, updates and delete actions.
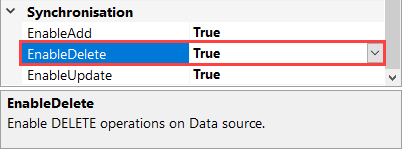
Please note that deletes are disabled by default but will still show in the results. To enable deletes please set EnableDelete to true in the target connection properties.
Click onto each option to view the changes that will be applied to Salesforce. For updates the changes will be highlighted in yellow.

To synchronise the results click onto the Synchronise button and then Start to begin the sync.
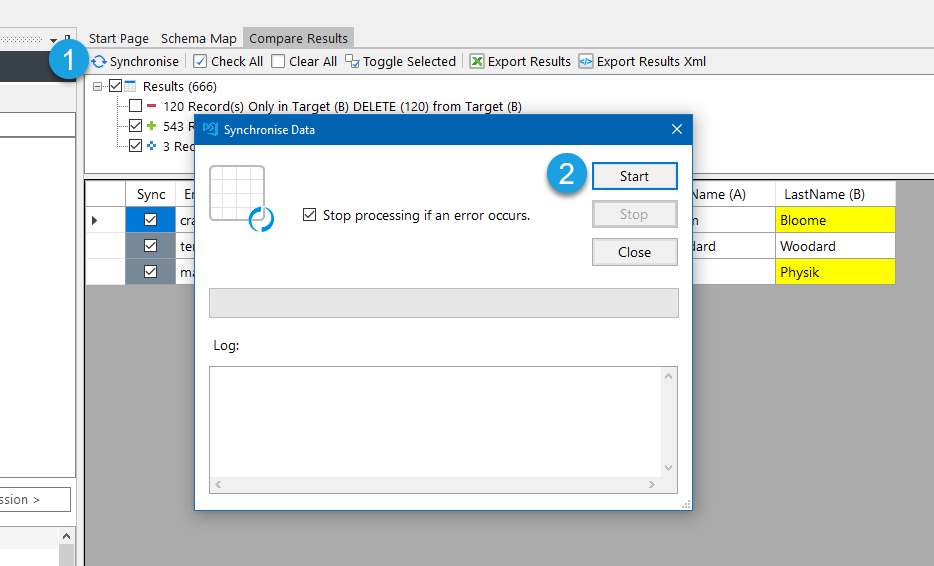
Your contact records will then be added to Salesforce and available to view. Make sure to save your project so that you can use it again in the future.
Exporting Data from Salesforce
If you need to get data out of Salesforce and integrate it with another business system then Data Sync makes this into another simple task.
You can export the data previews to files such as XML, CSV, Excel and JSON for one off exports by using the buttons in the export window.

Alternatively you can create a new SQL table, CSV File or XML dataset for example from the tools menu, or you can connect to an existing system using any of the connectors available.
In the example below we are setting up a project that will export the salesforce account records to an existing SQL table on a regular basis.
Connect to your Salesforce Object
To connect to Salesforce in Data Sync you need to have first configured the app registration in Salesforce so then you have all the details needed to connect via OAuth.
You will need the redirect URL port number for your app registration which can be found in the connection window of Data Sync. To get to this click onto the source window and go to Salesforce > Salesforce Object.
Once you have configured the app in Salesforce you can enter the Consumer Key and Consumer Secret into the connection window in Data Sync and click Authorize Connection to validate the app.
If the authorisation is successful you will be able to select an object to connect to from the object name dropdown list.
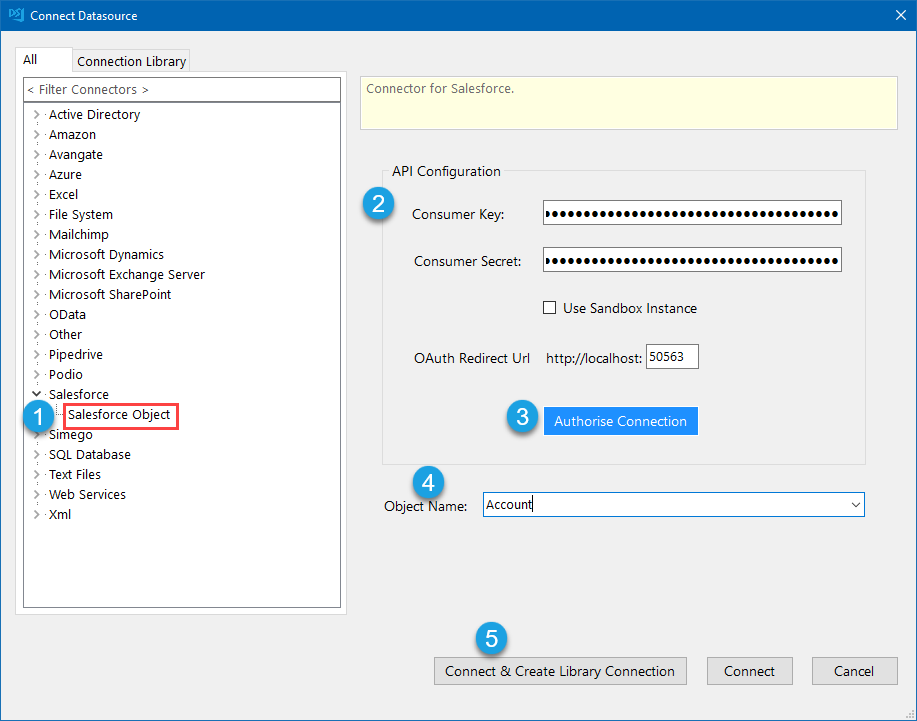
Click Connect & Create Library Connection to save the connection to the connection library. This only needs to be done once per site as you will be able to access the other objects from the connection library.
If you have already saved your connection to the connection library then you can expand the connection and select the object you want to connect to.
Connect to your SQL table
To connect to a SQL table click onto Connect Datasource in the target window to open the connection window. Then navigate to SQL Database > Microsoft SQL Server (SQL Client).
Enter in the network name of your SQL Server, any credentials you might need to connect and set encryption or trusted certificate as required.

Click Connect & Create Library Connections to save this database connection to the connection library. This only needs to be done once per database and will make future project setup easier.
Select the database and table from the tree view to connect to, and if you are saving to the connection library another window will open where you need to enter a name in for the connection.

This will load the columns in your SQL table into the target window.
Map the Source & Target Columns
You now need to configure the schema map so that the columns in Salesforce are mapped to their corresponding column in your SQL table. Make sure that the data types are correct and that you have selected a unique key column that can be used to identify each record.

Compare the Results and Sync
Once the mapping is complete you can click Compare A > B to preview the changes that need to be made. Here you can preview additions, updates and delete actions that need to be made.
Please note that deletes are disabled by default but will still show in the results. To enable deletes please set EnableDelete to true in the target connection properties.
Click onto each option to view the changes that will be applied to your SQL Table. For updates the changes will be highlighted in yellow. In this example we have 80 records to add and 3 to update.

To synchronise the results click onto the Synchronise button in the toolbar and then Start to begin the sync.
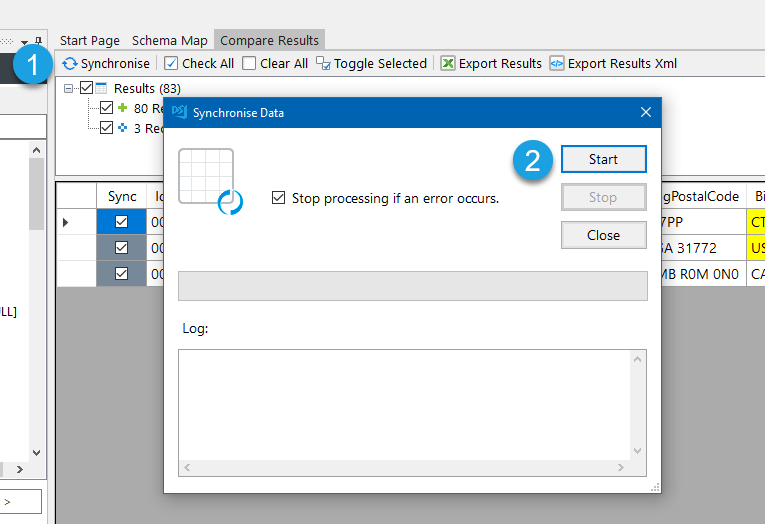
Your contact records will then be added and available to view in your table.
Make sure to save your project so that you can use it again in the future.
Additional Options
Below you will find a couple of other topics such as troubleshooting, filtering the records and how to run the projects on a schedule.Filtering the Results
When exporting results from Salesforce you can filter the results returned before you export, using either a SOQL Query or the filter box built into Data Sync.
SOQL Query
To use a SOQL query you need to have first connected to Salesforce and saved the connection to the connection library. You can then either drag and drop or right click and connect to the SOQL Query connector within your Salesforce connection. To add the query to the project click onto the ellipsis in the connection properties window in the query field and hten enter in the statement. You can import a query statement by using the Open From File button to browse for the query.
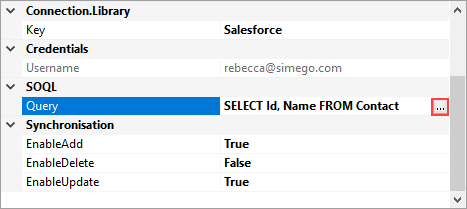
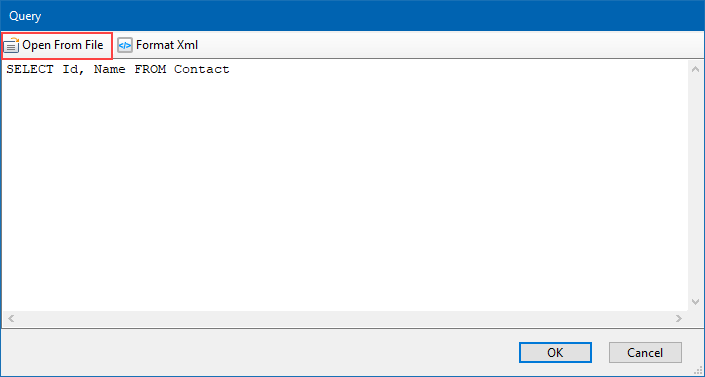
An example of a SOQL Query you could use could be, to select all records in the contact object that have a first name of "Dave":
SELECT Id, FirstName
FROM Contact
WHERE FirstName = "Dave"
Filter Box
To use the filter box built into Data Sync, start by connecting to Salesforce. Then enter in a function to filter your records. This function needs to be in a C# friendly format i.e. no spaces in the column names and no special characters.
An example to filter the results for a specific company is: Name == "MyCompany"
The expression needs to return true in order to return any results. So for the example above if there is not an exact match for MyCompany in the Name column in Salesforce then no results will be returned.
If MyCompany exists then the record will be returned.
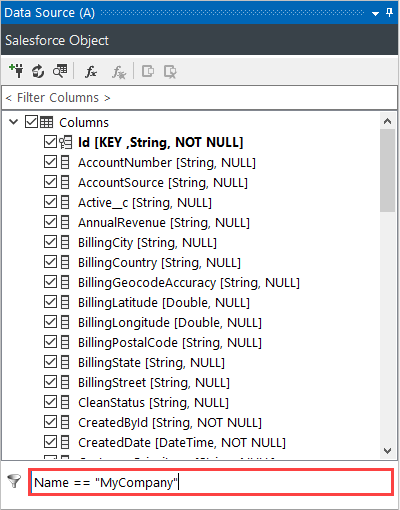
To preview the results click onto the Preview A button in the schema map window.

Automate and Schedule
If you want these projects to run on a regular basis then you can automate them and schedule them to run using either the Run Tool & Windows Task Scheduler or Ouvvi Automation Server.The Run Tool will enable you to collect together multiple projects to run in a sequence and then schedule them to run at a regular time or interval using Windows Task Scheduler. The Run Tool can be accessed either through the start menu or through the Tools menu in Data Sync.
There a multiple step types available so that you can build out your integration project further. For example you can add an email report step to send an email every time the project runs or if there is a failure. You will find more information on how to use the Run Tool here.
If you want a fully documented integration manager and scheduling system then Ouvvi will be the tool to use.
Ouvvi enables you to bring together multiple projects, steps and even Run Tool projects into the workspace and then schedule these to run using either time based or event based triggers. The whole environment can be documented at a click of a button and you can add additional description to each of your projects and steps to help other users understand their function.
You can find more information on how to get started with Ouvvi in our training pages.
Troubleshooting
Connection Erroring a day later
If you find the connection errors on the second day that the project runs then it is likely you didn't save it to the connection library. The connection library handles getting the refresh token for you whenever it is needed.
Alternatively it might be that you didn't add the correct scope when creating the app in Salesforce. Please take a look at your app registration in Salesforce to ensure that the Perform requests on your behalf at any time (refresh_token, offline_access) scope has been added.
What API and API version does the connector use?
The Salesforce connector uses the REST API and binds to the latest version available, so you remain ahead of any deprecations.
If you have any questions on how to use Data Sync, the Run Tool or Ouvvi, or need more help connecting to Salesforce please reach out to us at support@simego.com.

