Sending a Data Set as an Email and Email Attachment
Using the Email DataSet connector to send a dataset as a HTML table and file attachment
We've been developing Data Sync so that it's functionality continues to improve. You can now send an email with data from your source contained in a HTML table in the email body and as a file attachment in the output of your choice (CSV, Excel, XML, or JSON).

A couple of solution ideas for how you might use this connector:
- Send a weekly pricelist to customers for example, every monday
- Email a list of daily tasks to teams from your data set
- Update specific teams when a dataset has changed so that they have the most upto date version
- Send a dataset on a regular schedule in preparation for a daily/weekly/monthly meeting
- Send a report of users that are members of a specific Active Directory Group e.g. Admin User
- Send a report whenever a new user is added to a specific Active Directory Group
- Send a report of items added or modified in a SharePoint List
We currently use this connector to send us a daily report of who has a trial and is using it.
In the guide below, we cover how you would configure the project once you have saved the connection to the connection library. This project would work well in Ouvvi if it was needed on a regular basis.
Requirements
Before getting started you need to ensure you have the following:
- Windows 10 or Windows Server
- Downloaded & Installed Data Synchronisation Studio
- Configured the connection to your Email Server
- A data set to connect to and send
If you do not have Data Synchronisation Studio you can get a free evaluation edition. To test the automation using Ouvvi please contact us to upgrade your trial key.
Connect to your Source
Start by opening Data Sync and connecting to your source data. This can be any data set gathered from any any of your systems that we have a connector for.
In this example we have a SQL table as our data source with a list of products and their prices. We want to send this to the sales team so that they have the most upto date prices each day.

For details on how to connect to sql have a look at our documentation pages here.
Create Email DataSet
We recommend doing your initial connection to your Email Server first and saving this to the connection library. The full documentation on how to connect initially can be found in our documentation.
Once you have saved your connection to your Email Server you can use the Create Email DataSet function from the tools menu.

Enter in the email addresses you want to the message to go to, a subject line, determine the HTML table type you would like (Table or TablePivot), and specify the attachment type and filename it should have.
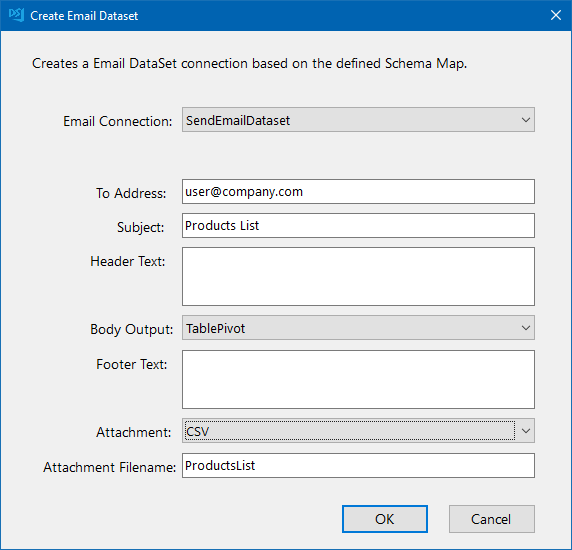
The two table types, table and tablepivot present the data in slightly different ways. The Table output shows each record as a row in the table, whereas the TablePivot creates a table for each record with the columns as the rows. This table is presented in the body of the email and an example of how each can look can be seen below.
The Table output looks like this in the email:

The TablePivot output looks like this in the email:

If you do not want to include a table of the data, e.g. if the dataset is quite large, then you can exclude it by setting the Body Output to None.
You have a choice of attachment file types to chooose from: CSV, XML, Excel and JSON. Just select the type you need from the dropdown and enter in a file name. If you do not want to include an attachment just set the attachment to None.
Once you have configured your email click OK to set this as your target.
Map the Source & Target Columns
The columns will be automatically created added based on the source columns added to the schema map.
If you missed adding a column to the schema map or you want to rename a column, you can add this by going to the properties window below the columns in the target connection window and finding the Columns property.
Open the columns collection editor by clicking onto the ellipsis.

Once the collection editor is open you can edit the existing columns or add a column. To add a columns click onto Add and then set the Data Type and enter a name for the column. Once you are done making changes you can click OK to save the changes.

Make sure to refresh your target by clicking onto the refresh button in the datasource.
You can then add and remove columns to the schema map so that only the data you need is included. Make sure to select a key column that can uniquely identify each record.

Compare and Sync to Send the Email
To send the message click the Compare A > B button, this will show the records being sent, and then click Synchronise and Start.

The email message will now be sent. Make sure to save your Data Sync project so that you can use it again in the future.
Automate & Schedule
As this project wants to be run on a regular basis it should be scheduled using either the Run Tool or Ouvvi.
Ouvvi gives more options for scheduling, with both time and event based triggers. So you could configure a trigger to start your project whenever a change is detected in your SQL table or SharePoint List. Note that this requires using a modified date time stamp in your SQL table.
Alternatively you can use the run tool to schedule the project to run using Windows Task Scheduler.
Run via the Run Tool
The Run Tool is an additional program that comes linked to Data Sync and enables you to build out your data integration jobs.
You can use this to group Data Sync projects that need to run in order and add additional step types such as adding an status report to email you when the project has run and if there were any failures. Each step is run in the order it appears in the list and you can apply conditional rules so that the next step can run if the previous one succeeded or had data changes for example. To find out more please see our Run Tool Documentation.
To open your project in the Run Tool, in your Data Sync project go to Tools >Open in Run Tool.

You can then click onto the green Run button to check it runs as expected. If there are data changes you will be provided with a count of how many items were added updated or deleted

Run via the Command Line
Another option is to Run the Run Tool project or single Data Sync project from the command line. To do this pass the path to the project file like this:
Run Tool Project
Data Sync Project
Automate with Windows Task Scheduler
You can then schedule your Run Tool project to run when you need it to using Windows Task Scheduler. For the full details on how to do this see our Task Scheduler Documentation.
Automate with Ouvvi
An alternative option, with more scheduling capabilities is to use Ouvvi Automation Server. Ouvvi enables you to fully schedule and manage all of your Data Integration Projects, from Data Sync projects to SQL Statements to Powershell Scripts.
It provides full logging and documentation capabilities to fully manage your integration operations.
To find out more see our Ouvvi Documentation or send us an email.

Filtering the Data Set
If you don't want to return the full data set in the email, you can filter the results returned.
For example you might want to filter the results on the modified date column in SharePoint or by members of a specific group in Active Directory. You can run a SQL statement, CAML, LDAP filter etc. to filter the data server side rather than client side. This is better if your dataset is quite large.
To do this you can use the filter box in the source window or if you want a more complex filter you can write a C# expression using Dynamic Columns.
In the filter box enter in a C# expression that returns true, you can also use any of the functions you might use when buiding a calculated column.
If we take the SharePoint example, where we want to return records that were modified since yesterday, we could run a query similar to: Modified > DATEADD("day", -1, TODAY())
This would then return only the items that had a modified date of today's date minus 1 day.
NB: Your column names need to be in a C# friendly format i.e. have no spaces and no special characters (except for underscores)
