All you need to know about integrating Podio Apps with your Email Provider
You can speed up data entry into Podio by emailing your Apps and Tasks. Below we are going to explore the various Podio Integrations with email providers such as Outlook, Gmail, and Exchange.
We topics we are covering are:
- Creating Podio Tasks from an Email
- Creating a Status in Podio from an Email
- Emailing a Podio App to create records
- Creating comments by email and item
- Getting an email when an item is added or updated in a Podio App
Create Tasks From An Email
You can quickly add tasks to your Podio tasks by emailing your personal Podio task list. To do this you first need to find your Podio tasks email as this is unique to each user. Any emails sent to this address will create a new task assigned to you.
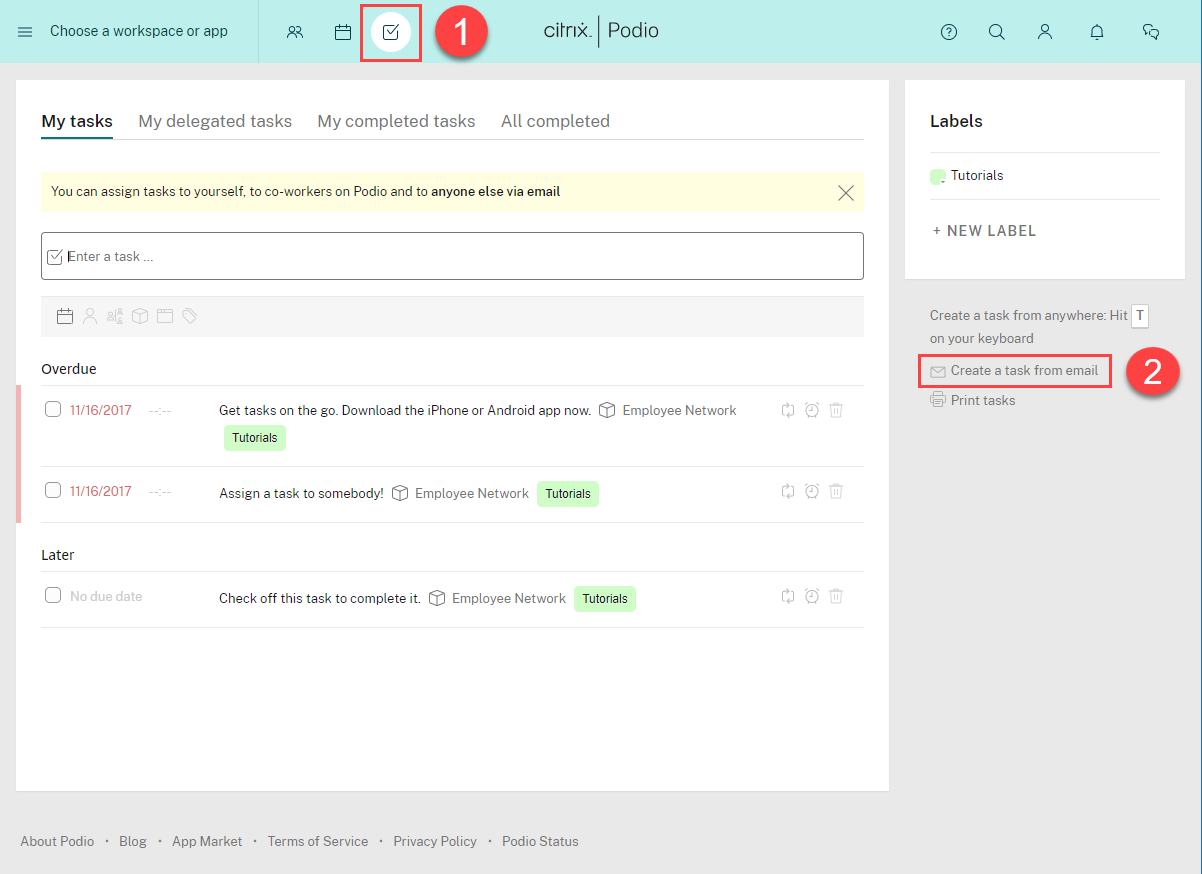
Open Podio and go to Tasks along the top menu. Then to the right of the page click Create a task from email.
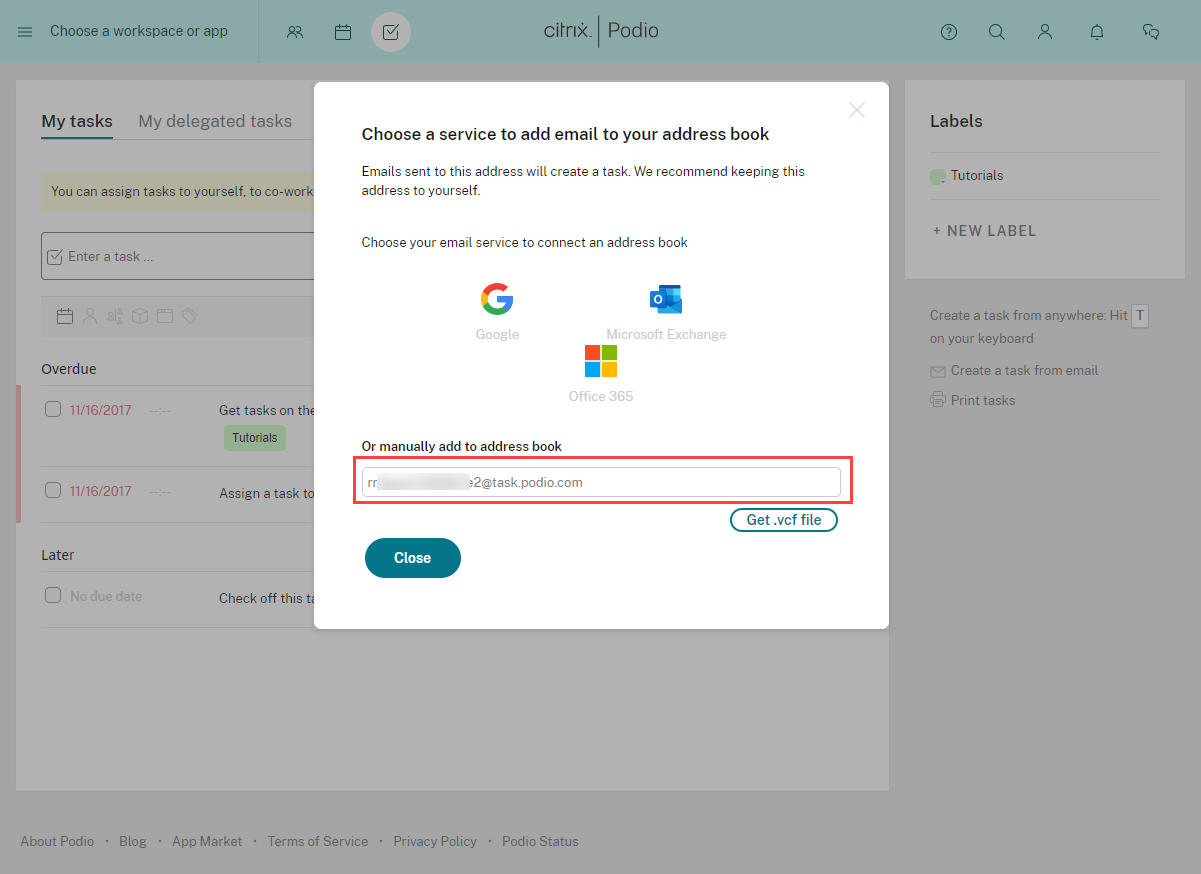
You will now be shown your personal task email address. Simply copy the address and add it to your address book or just enter it into the to field.
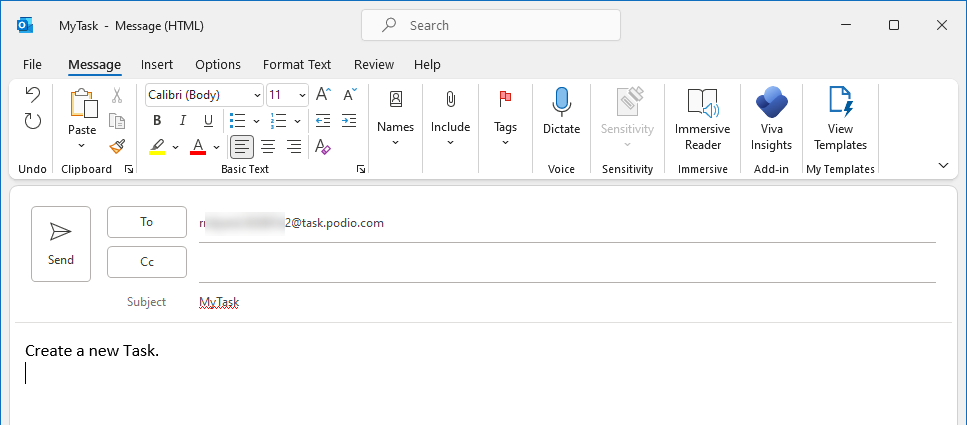
Once you have your task email address you can just send an email to it to create a new task. The subject of the email will become the task title and the body will become the task description.
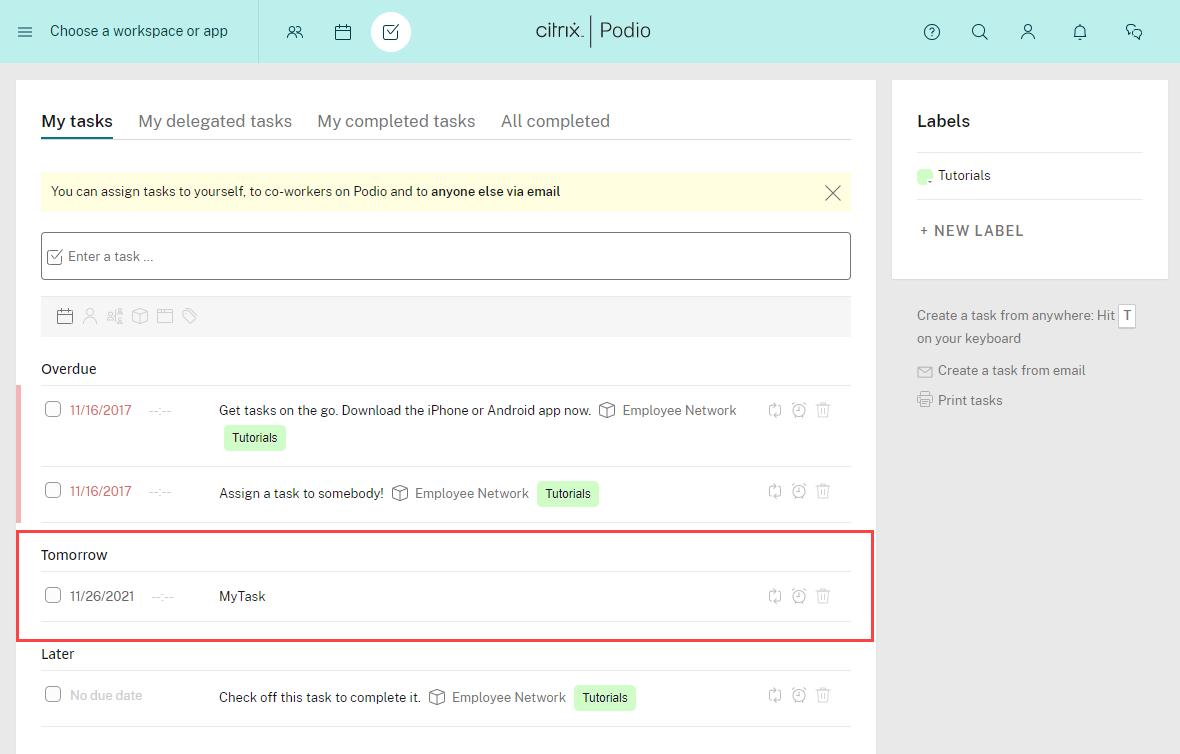
And here we can see the task specified in the email was added to the task list.
If you want to add a task to someone else's task list, ask them for their unique task email address and just send them an email. They will not be notified that there is a new task, so you will need to let them know that you have assigned a task to them.
Create A Status From An Email
If you want to make your team aware of an email relevant to the Workspace then you can post it as a status to the Activity Steam inside your Podio Workspace.
To do this you need to get your personal email address from Podio. Any emails sent from this address will be marked as posted by your account.
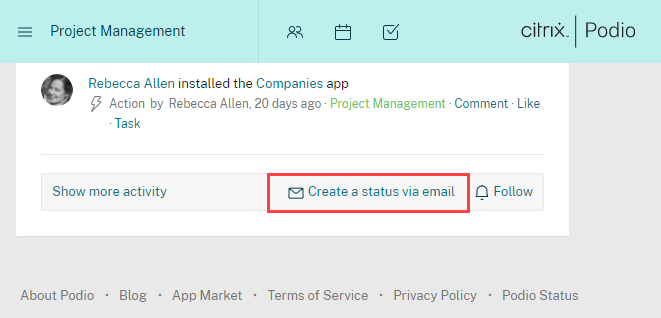
You can find the email address by going to your workspace activity stream, scrolling to the bottom and selecting Create a status via email.
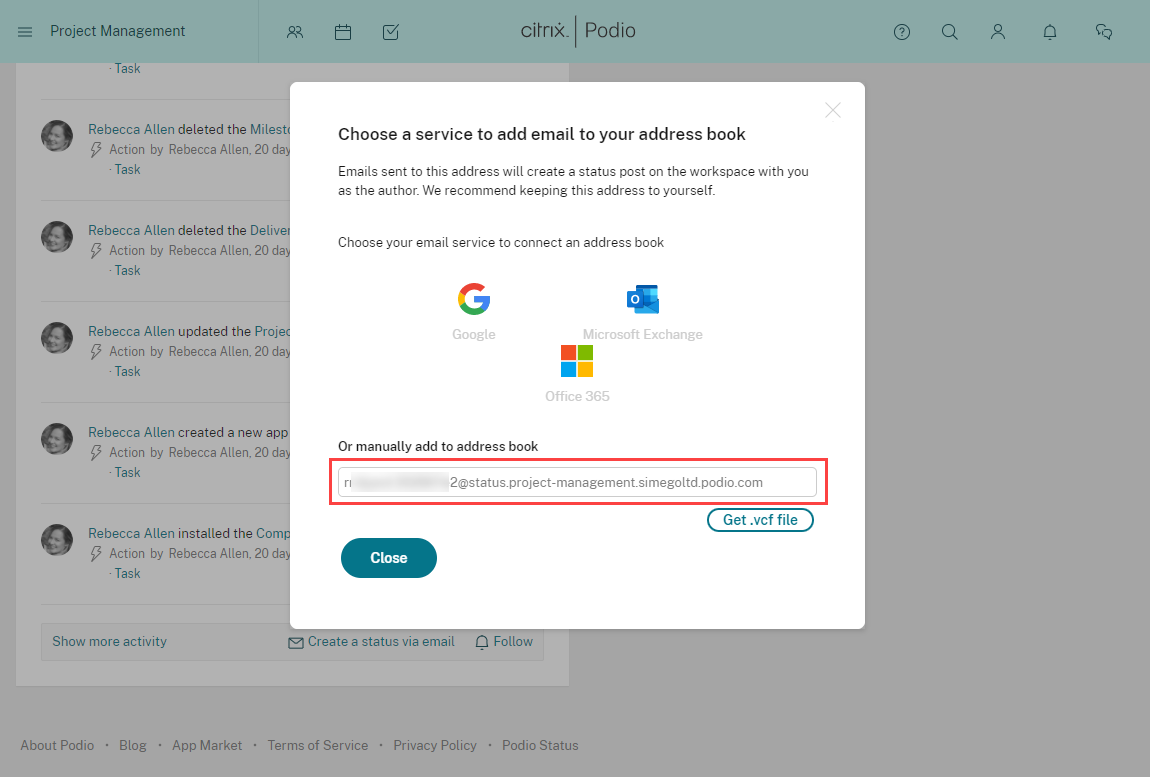
Copy the email address and either add it to your address book or paste it into the address field of your email.
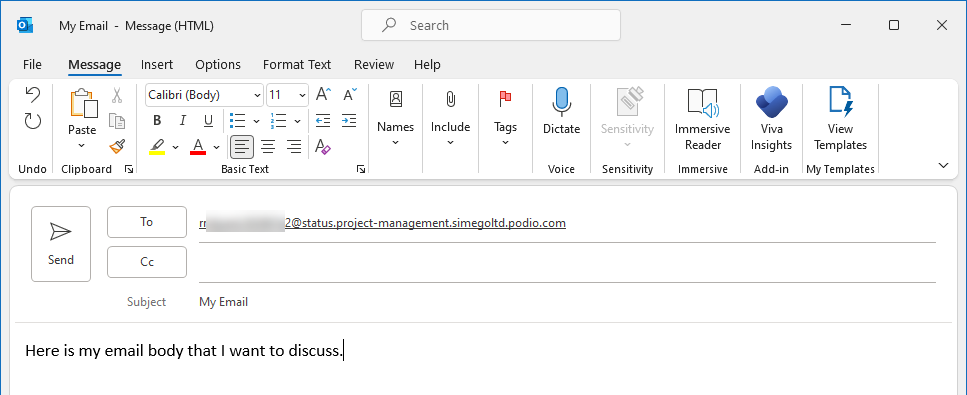
Now you can either create an email or forward an email to the Activity Stream. Here we have created a basic email where the subject becomes the title of the status and the body of the email becomes the body of the status.
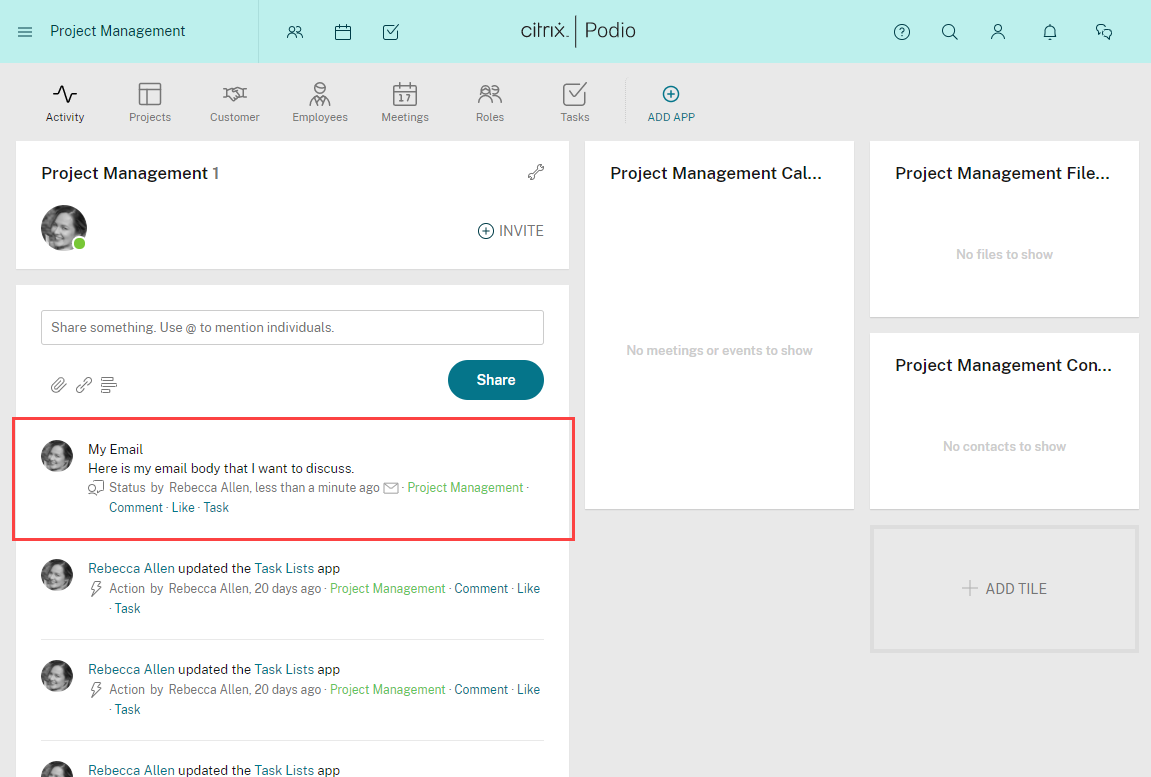
Now, if we go back to the Activity Stream, we can see the status has been added as expected.
Email An App To Create Records
You can email a Podio App and create a record within that app based upon the information contained in the email. It can be a useful tool for quickly storing communication records rather than manually entering them each item. There are a couple of limitations to this feature to note: it is not available to use in Event apps, and users can only attach 20 files.
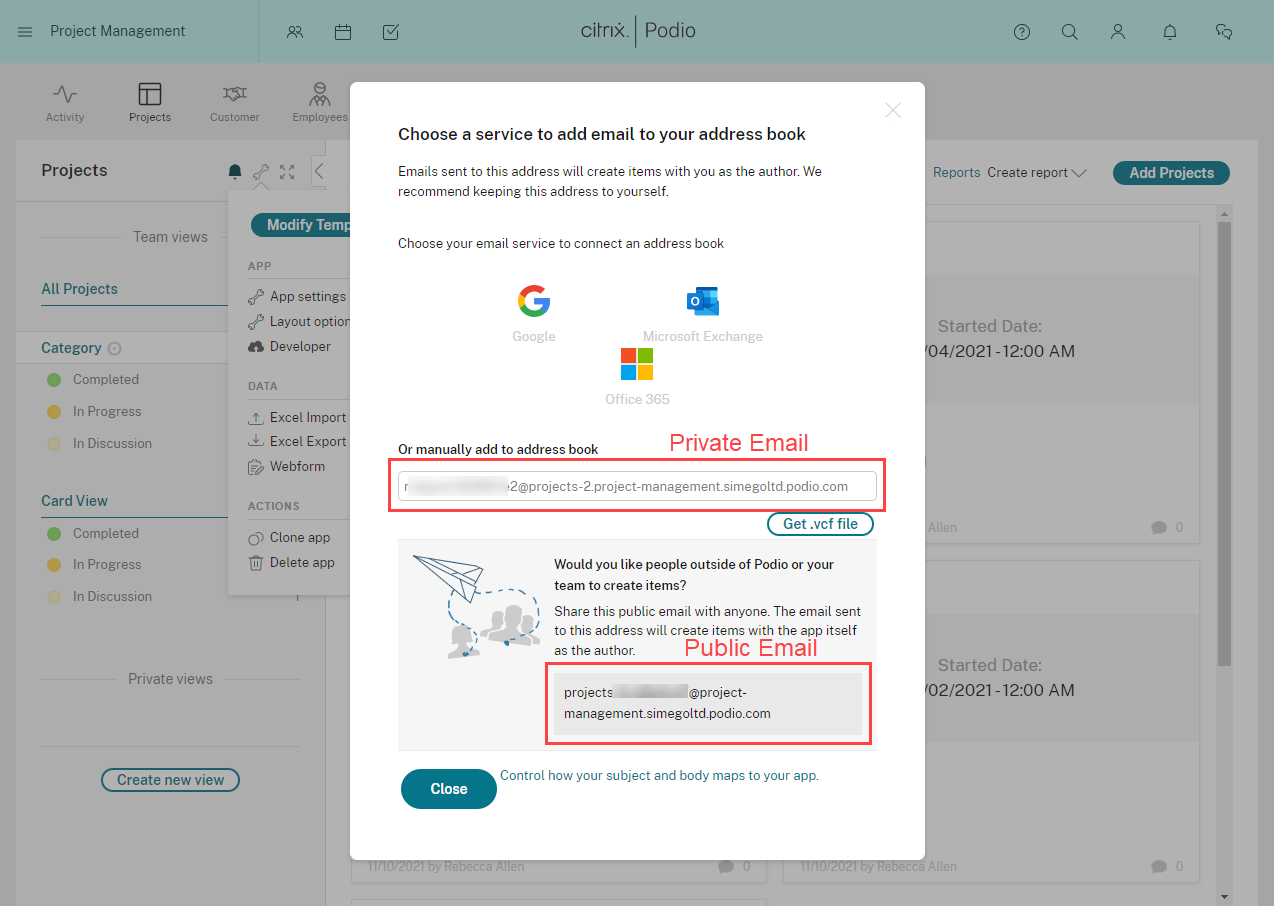
You have two options of unique emails with this feature, either a unique personal email that will set your account as the author or a public email address that will set the app as the author.
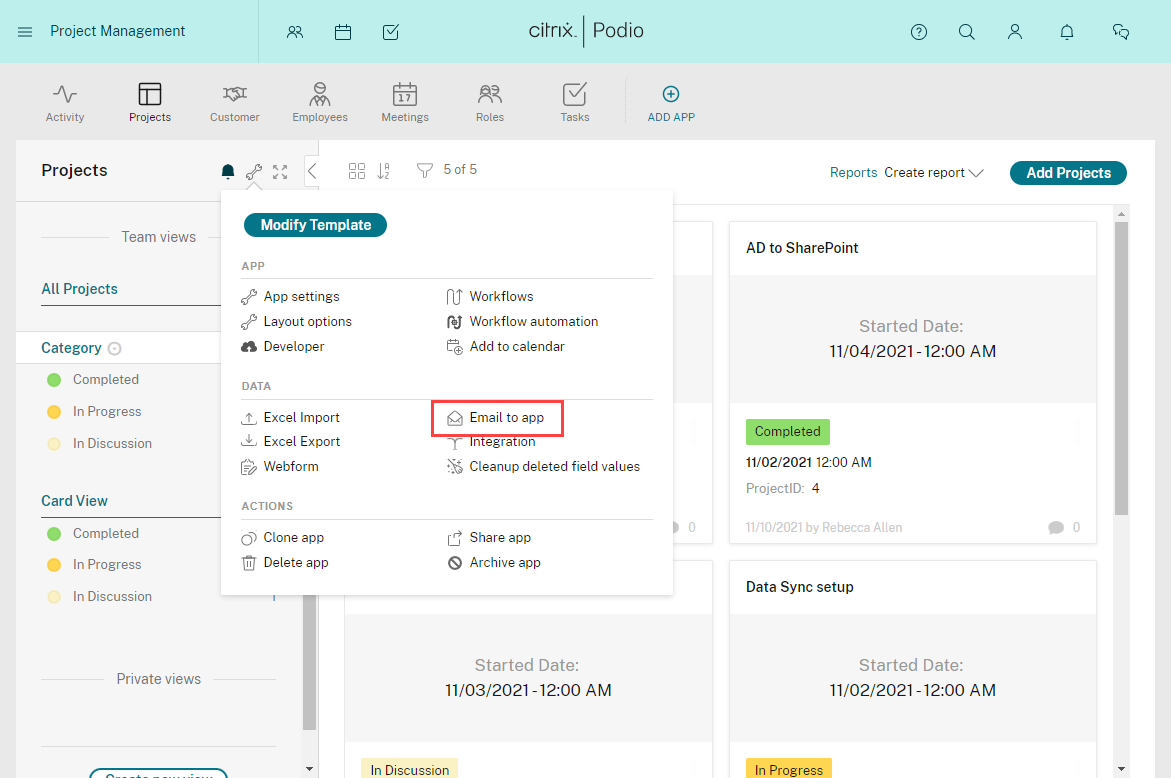
To get a copy of the email addresses, go to your app and click onto the wrench icon. Find and click onto Email to app.
You can now see your unique and public email addresses for that app. Copy the one you want to use and add it to your address book to use later or paste it into the To field of your email.
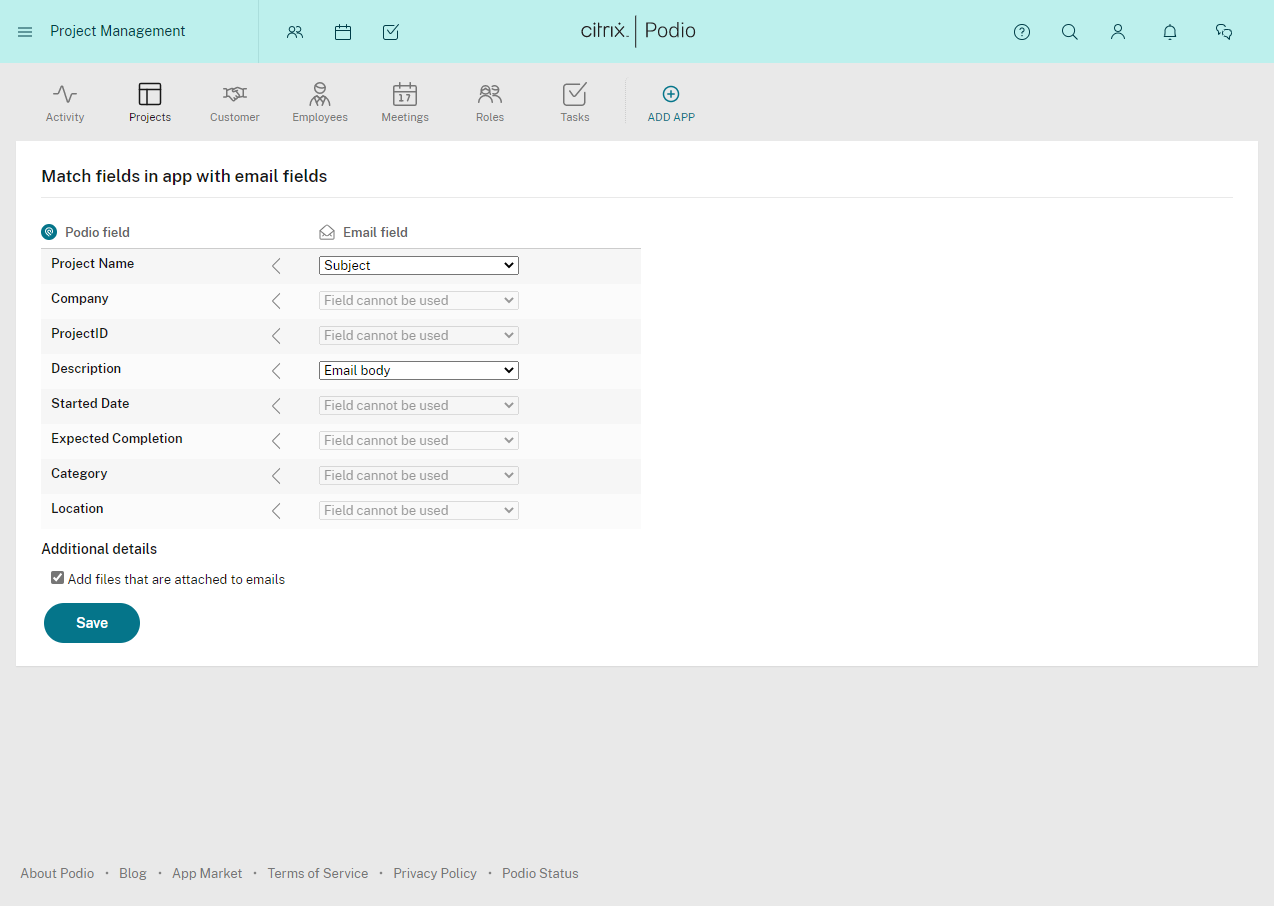
You can also define which fields from the app match the fields in the email by clicking on the "Control how your subject and body maps to your app" link. Match the fields as you need and decide if you want to add the files that might be attached to the emails, check the checkbox to attach them, or uncheck it to exclude them.

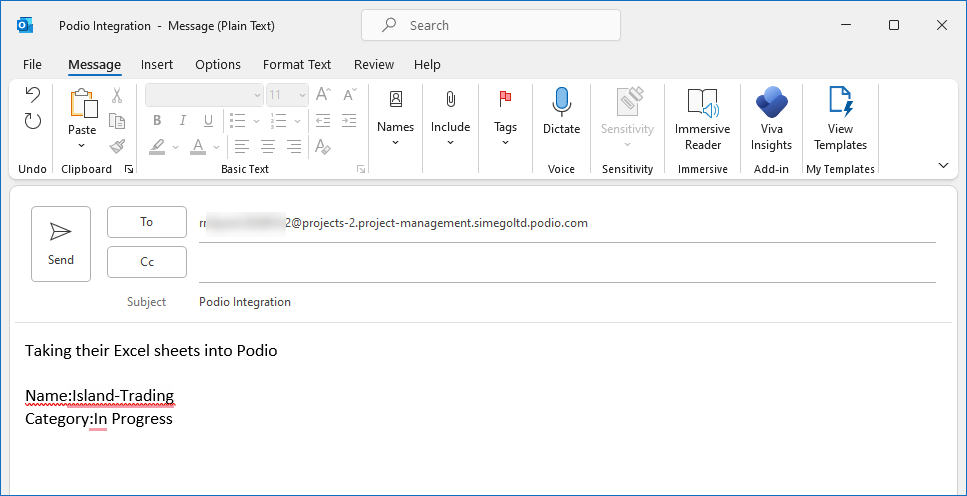
Podio will put everything in the body of the email to the field inside your app you defined earlier. If your fields are text fields you can make sure each item goes to the right place by using fields name:value to set the value for the right field.
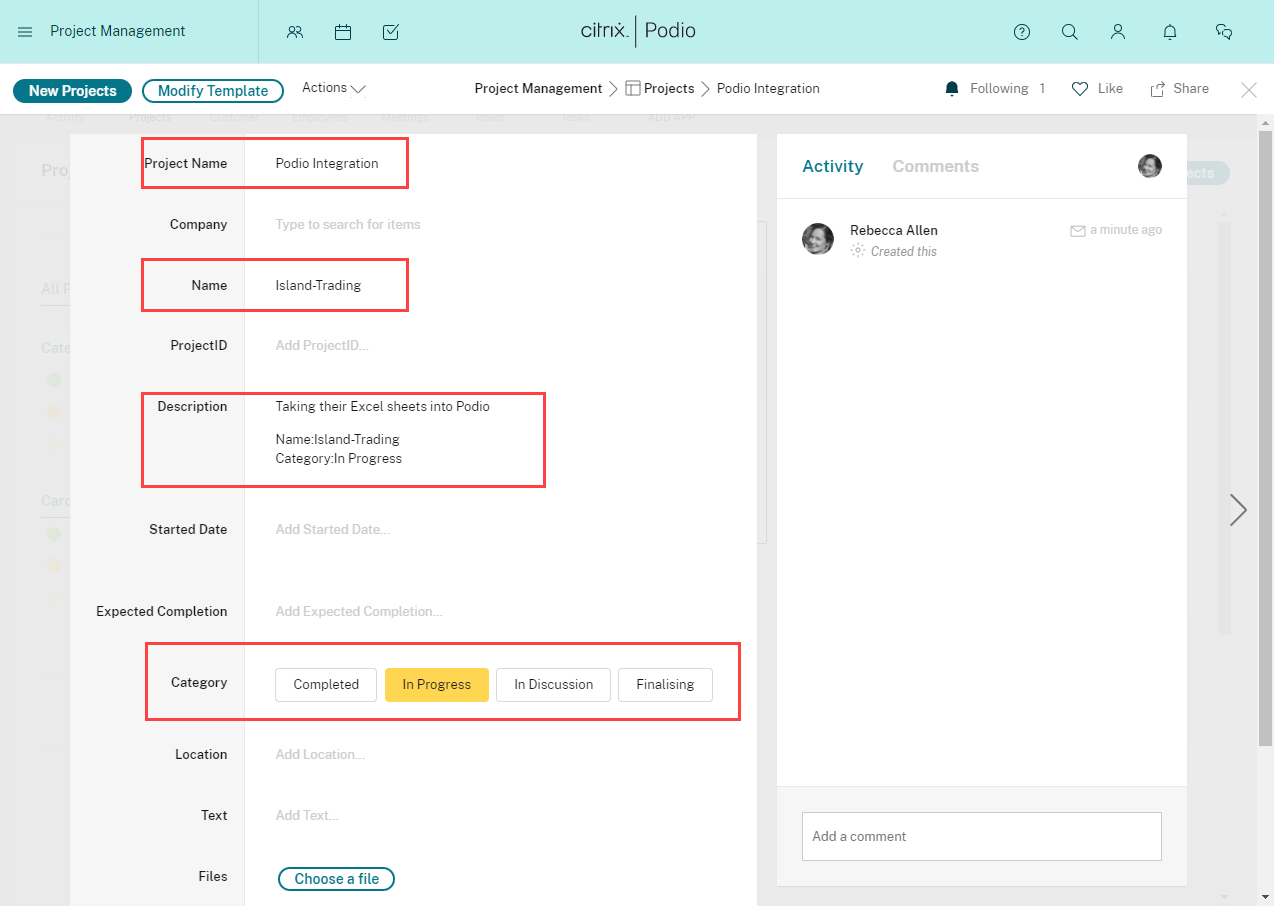
In this example we have set the category (a category field type) and the name (a text field type) with Category:In Progress and Name:Island-Trading.
Podio state that this is not a fully supported function and is not guaranteed to work 100%, we found it doesn't seem to work with dates, relationship, email and phone fields.
You can now either create an email or forward an email to your app. Just enter in the email address gathered earlier and send.
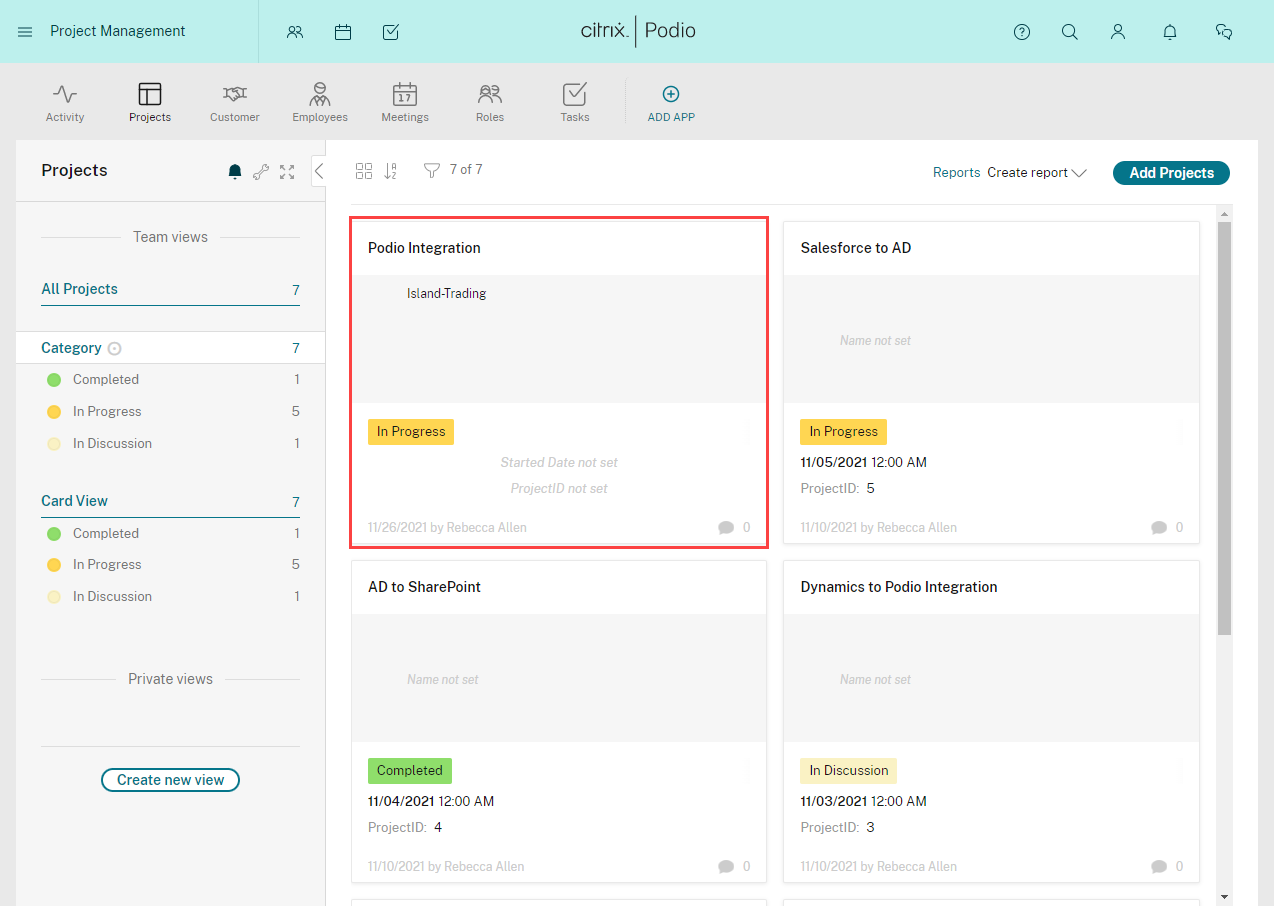
If we go back to Podio you can now see the email has been added as a record, and the specified values have been added to their defined field.
Create Comments By Emailing An Item
Using the email to item feature enables you to send a comment to a Podio item using an email. All you need to do is send an email to the unique item email and Podio adds the comment for you.
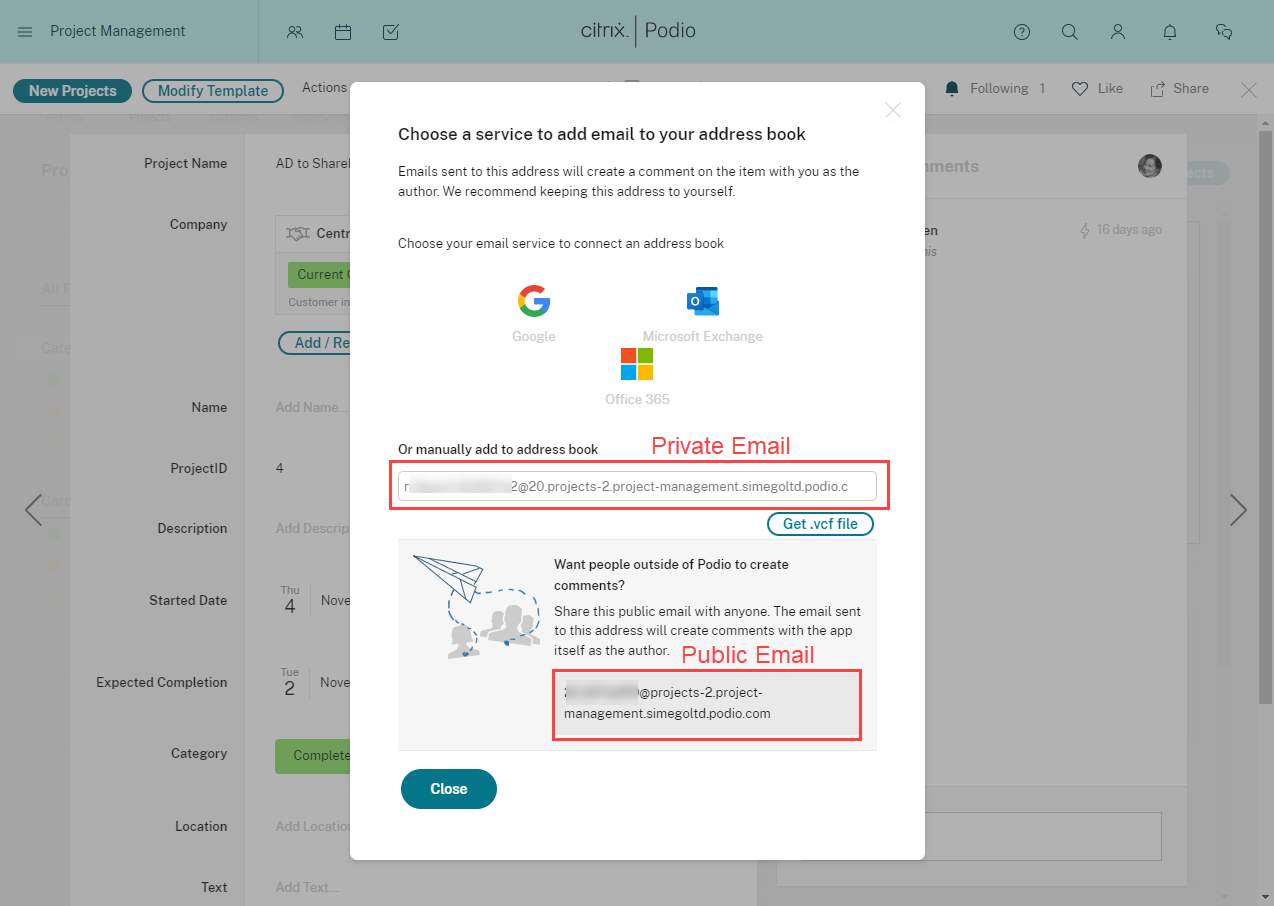
There are two email addresses available for items, a personal email and a public email. Using the personal email will set the comment to your account as the author. Make sure to not share this with anyone as they will be able to add comments as you. If you would like to enable others to post comments then you can use the public email address. This will set the app as the author instead of a specific Podio user.
It is worth noting that an Admin user cannot edit or delete comments made with public email address, but Admins can edit or delete comments made with your personal email.
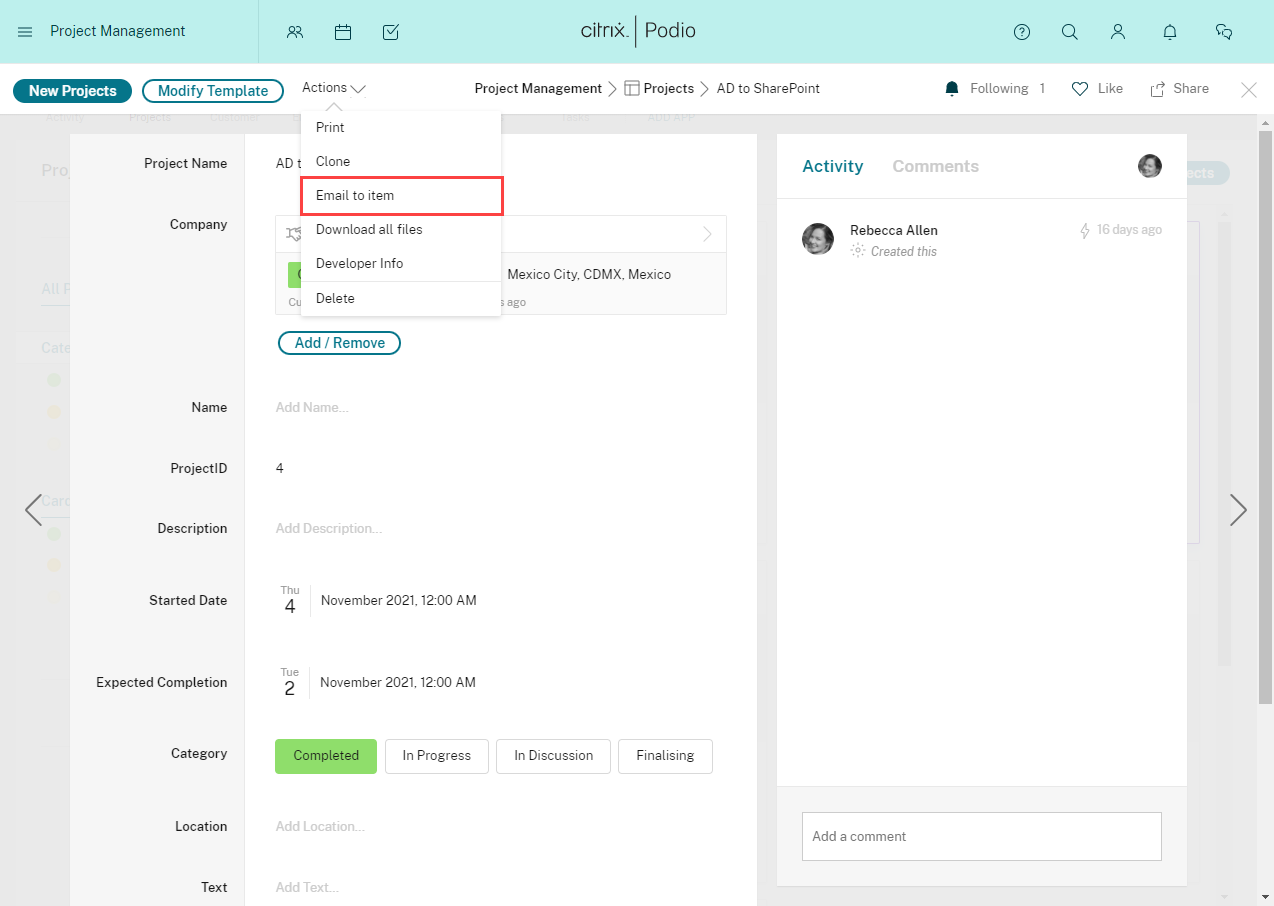
To get a copy of the email addresses open the item you want to target, click onto the actions dropdown and then select Email to item.
You can now see your unique and public email addresses for that item. Copy the one you want to use and add it to your address book to use later or paste it into the To field of your email.
Now either create an email or forward an email to your item to add as a comment. Just enter in the email address gathered earlier and click send.
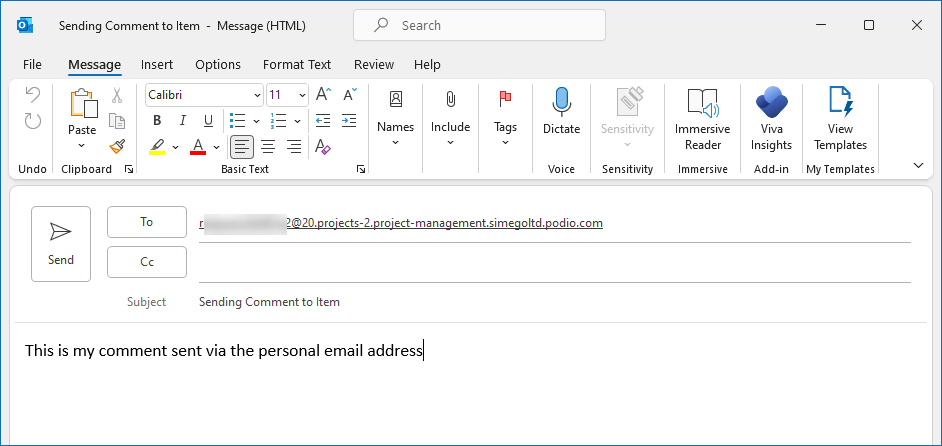
If we go back to the app in Podio, you can then see the email body has been added as a comment.
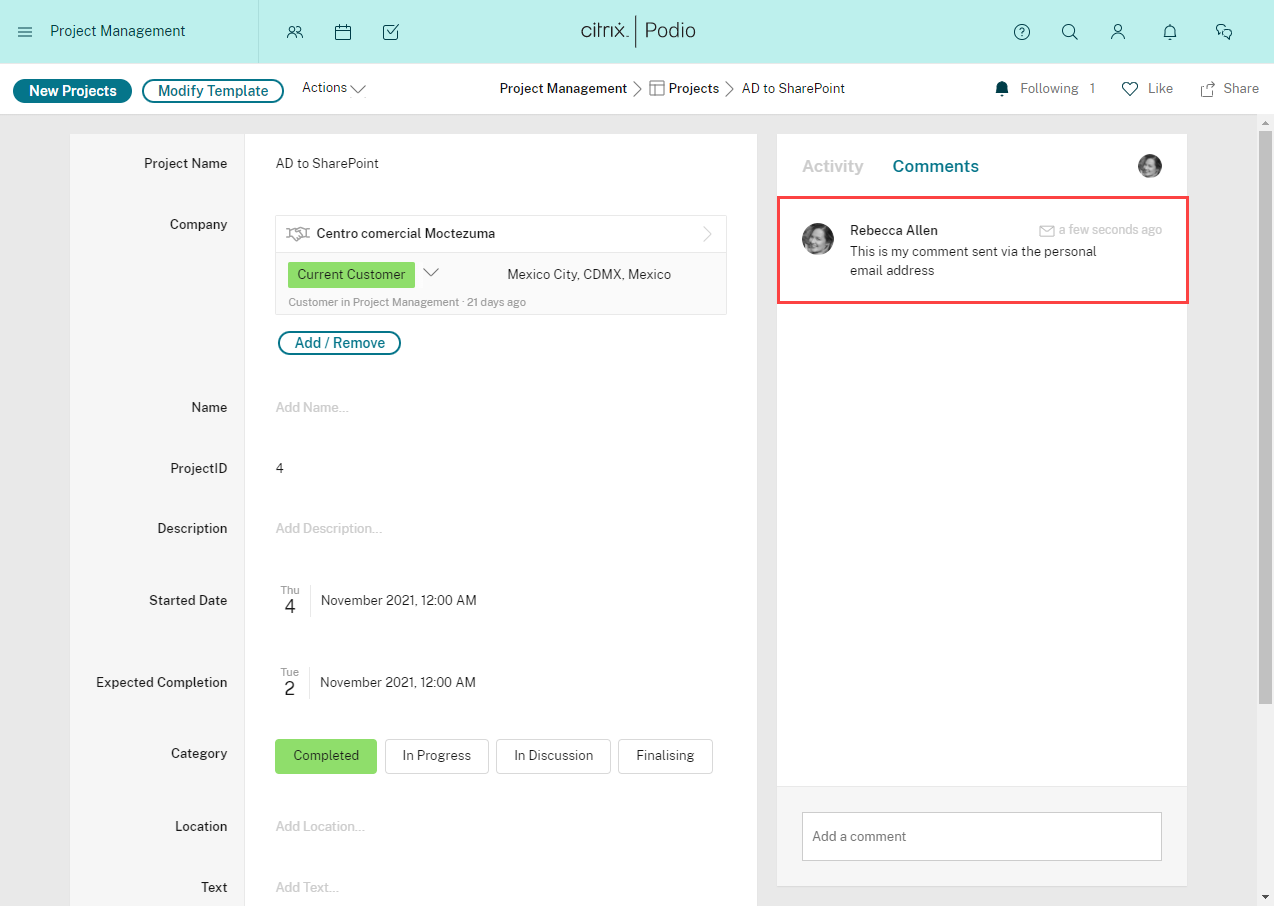
Receive An Email When An Item Is Added Or Updated In A Podio App
It can be incredibly useful be notified when a new item has been added or updated in a Podio App so then you know what has changed. This isn't a feature readily available in Podio however with the Simego Ouvvi Automation Server you can get an email including a snapshot of the item/s that have been added to your Podio App.
There are a few options to do this but the easiest and most coprehensive way is to make use of Ouvvi Apps to keep track of the items and notify you when there is a change.
I will assume that you already have an Ouvvi instance installed, however if you haven't got an Ouvvi Instance or would like to try Ouvvi send us an email and we can upgrade your trial key. You will also need to configure the SMTP setting inside Ouvvi to be able to send email reports. More details on configuring the SMTP settings can be found in the Ouvvi Settings documentation.
More details on getting started with Ouvvi can be found here.
The process we are going to follow is syncing the data from your Podio App into an Ouvvi App, setting and updating a sent status and creating a step to capture failures. We will then schedule the project with these steps to run at a regular interval, and when there is anything new added to the list or something is changed an email will be sent with a table of the data that has been added or updated.
To do this we make use of Data Sync to synchronise the data from Podio into an Ouvvi App. The full details on connecting to Podio can be found here and the details for Ouvvi Apps here.
If you haven't created an Ouvvi app before start by creating an Ouvvi App, this can be to hold your data or just an empty app. You need to have at least one app created in order to use the quick create function inside Data Sync to create an app to hold your data based off the source columns.
Create a Project to Sync the Data
The first step is to create a Data Sync project step in Ouvvi to sync the Data from Podio to the Ouvvi App.
To do this create a project inside Ouvvi for this whole process, in this example the project is called Ouvvi Apps Reporting.
Open the project and go to Steps > Data Sync Project.
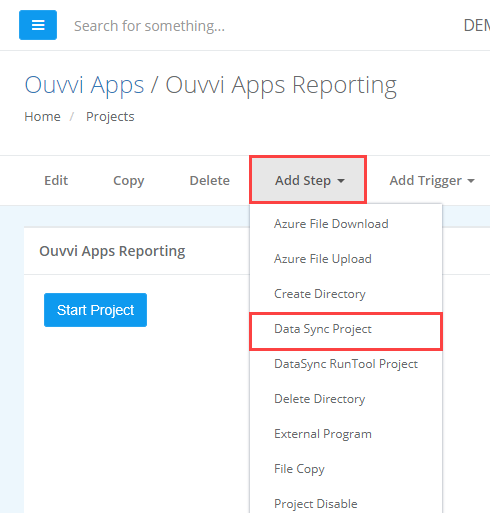
Type in a name for your Data Sync step (e.g. Add to Products) and click Save.
You now need to open the Data Sync project from Ouvvi by clicking onto the Open Project button. Data Sync will then open and will remain linked to your Ouvvi site. If you have uploaded your connection to Podio into Ouvvi then you can just drag and drop the app you need from the connection library, otherwise connect to Podio.

Add the columns you want to track to the schema map and then go to Tools> Create Ouvvi App to create an Ouvvi App to hold your data.
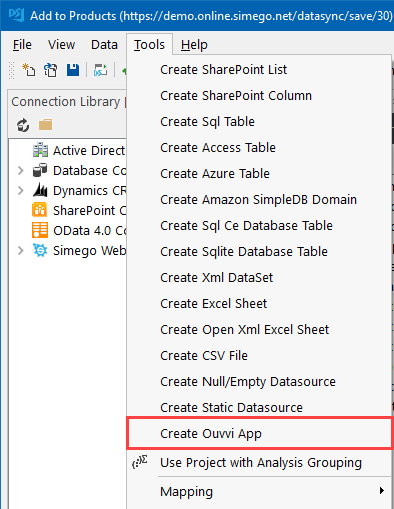
This creates an Ouvvi app with the columns you added to the schema map. Make sure everything is included and you have selected a key column to identify each record as unique, this is usually an ID column.
You can either run the compare and sync to add the data now or just save the project back to Ouvvi by clicking Save.
Add a Sent column to your Ouvvi App
Now go back to your Ouvvi site, and go to Ouvvi Apps. You need to edit your Ouvvi App to have a Sent column as we will be using this column to determine if an item needs to be included in the email report.
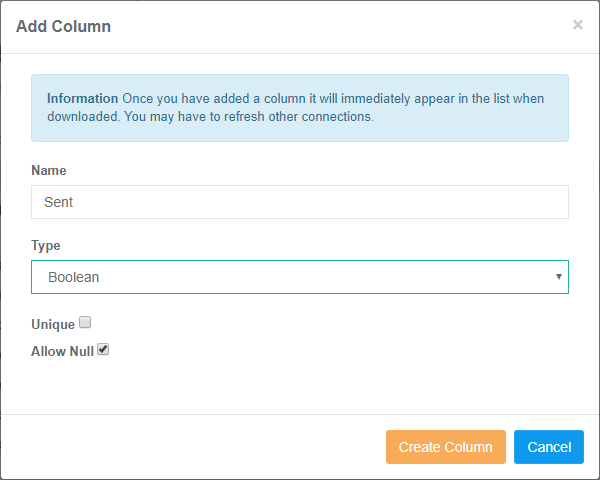
To do this open your app and select Add Column. Enter in a name (e.g. Sent) and set the column type to Boolean as this will have either true or false as the value.

Configure the step to Report the data
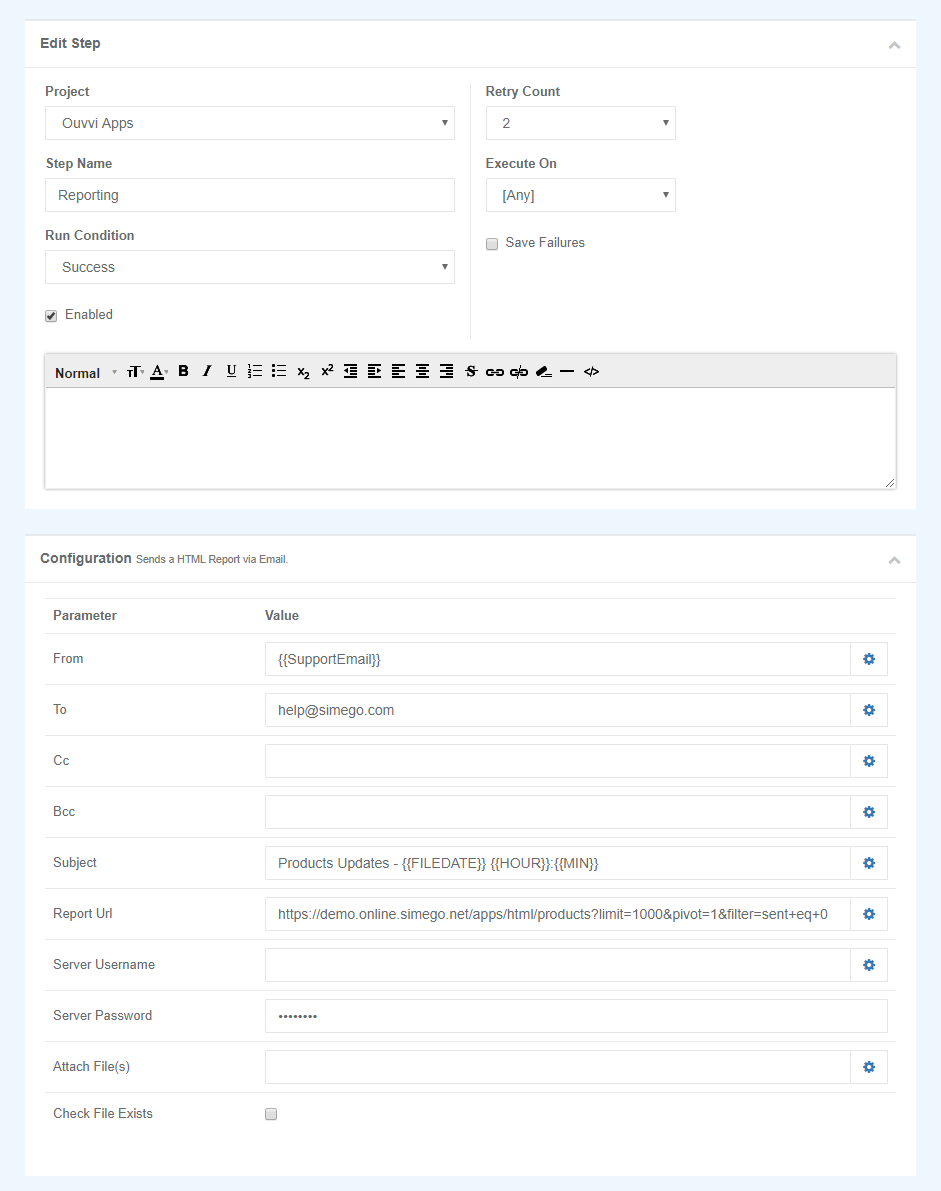
We now need to create a step to send the report. For this we use the Report Email step, go to Tools>More>Email Report Step`` to add this to your project.
Configure this with the To field of the email/s you want this to be sent to. Then type in a subject title for the email.
We have added a few user settings to differentiate between the different emails such as the date and time at the end of the subject.
You then need to add the URL to your html output of your Ouvvi App which will look something like http://localhost:8080/apps/html/testapp?limit1000&pivot=1&filter=Sent+eq+0 . The data returned from this URL will be the data that will show in your email report.
To get the URL to the HTML output open your Ouvvi App and go to Export > HTML, you can choose between a table or a list view so select whichever you prefer. Add the filter &filter=Sent+eq+0 to filter the results for only those that have not been sent.
Please note that until the data is synced with the app (including the sent status) this url will return no results.
Just save the step and then we need to configure marking items as sent and not sent.
Mark Items As Sent
Once an item from your Podio app has been sent in a report you do not want it to appear again in the list until a change has been made. To mark this as sent we need to add another Data Sync step to our project.
Go to Steps > Data Sync Project and then enter in a name such as UpdateSent.
Open the project using the Open Project button and configure the source and target to be your Ouvvi App.
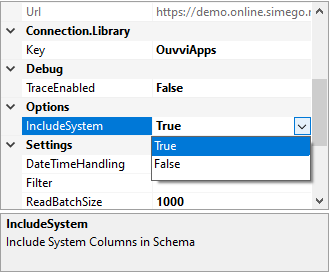
Set the project property IncludeSystem to true on both the source and target connections and then refresh the schema on both sides to show the internal Ouvvi App columns.
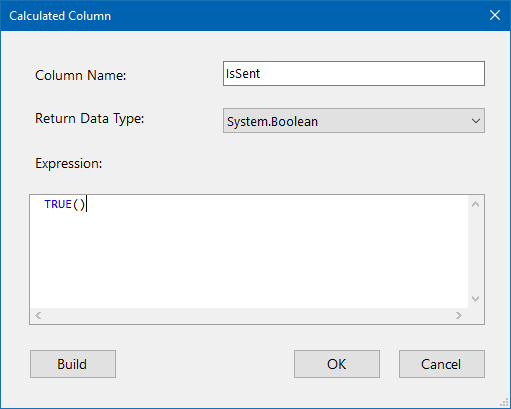
Then add a Calculated Column to update the sent status to True. This can be done by setting the Data type to Boolean and entering the expression TRUE().
Then just configure the mapping so that the system ID column and the new IsSent column is in the schema map, and map IsSent to the Sent column in the target. Then make sure to select the ID column as the key column and save the project back to Ouvvi by clicking Save.

Mark Items As Not Sent When They Are Updated
To make sure that if an item is updated it is included in the report of things that have changed we need to open the first Data Sync project that syncs Podio to the Ouvvi App.
In the source window add a calculated column to return a sent value of False. This is similar to the calculated column we made earlier but uses the expression FALSE().
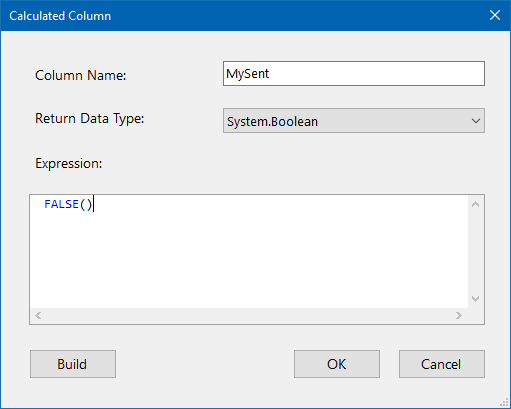
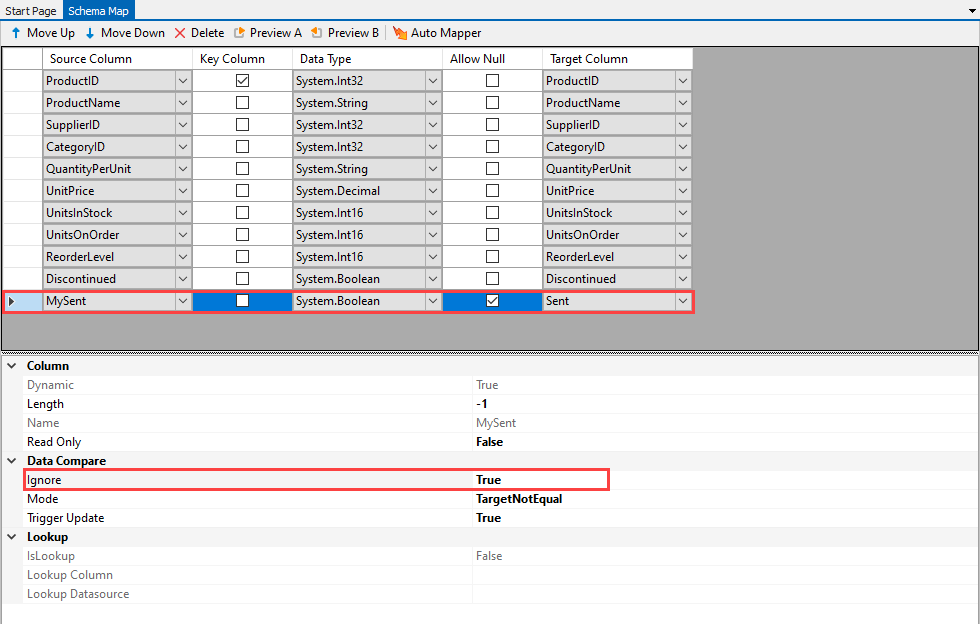
Add this to the schema map and map it to the sent column in the target. If your sent column isn't showing in the list click onto the refresh button in the target window to refresh the schema.
Then select the sent column in the schema map and change the schema properties so that Ignore is set to True. This will set the sent status to False if any change is made to the item. Meaning it will then be included in the report.
Failure Capture
To make sure you are notified if there are any errors we need to add a step to capture if the project fails.
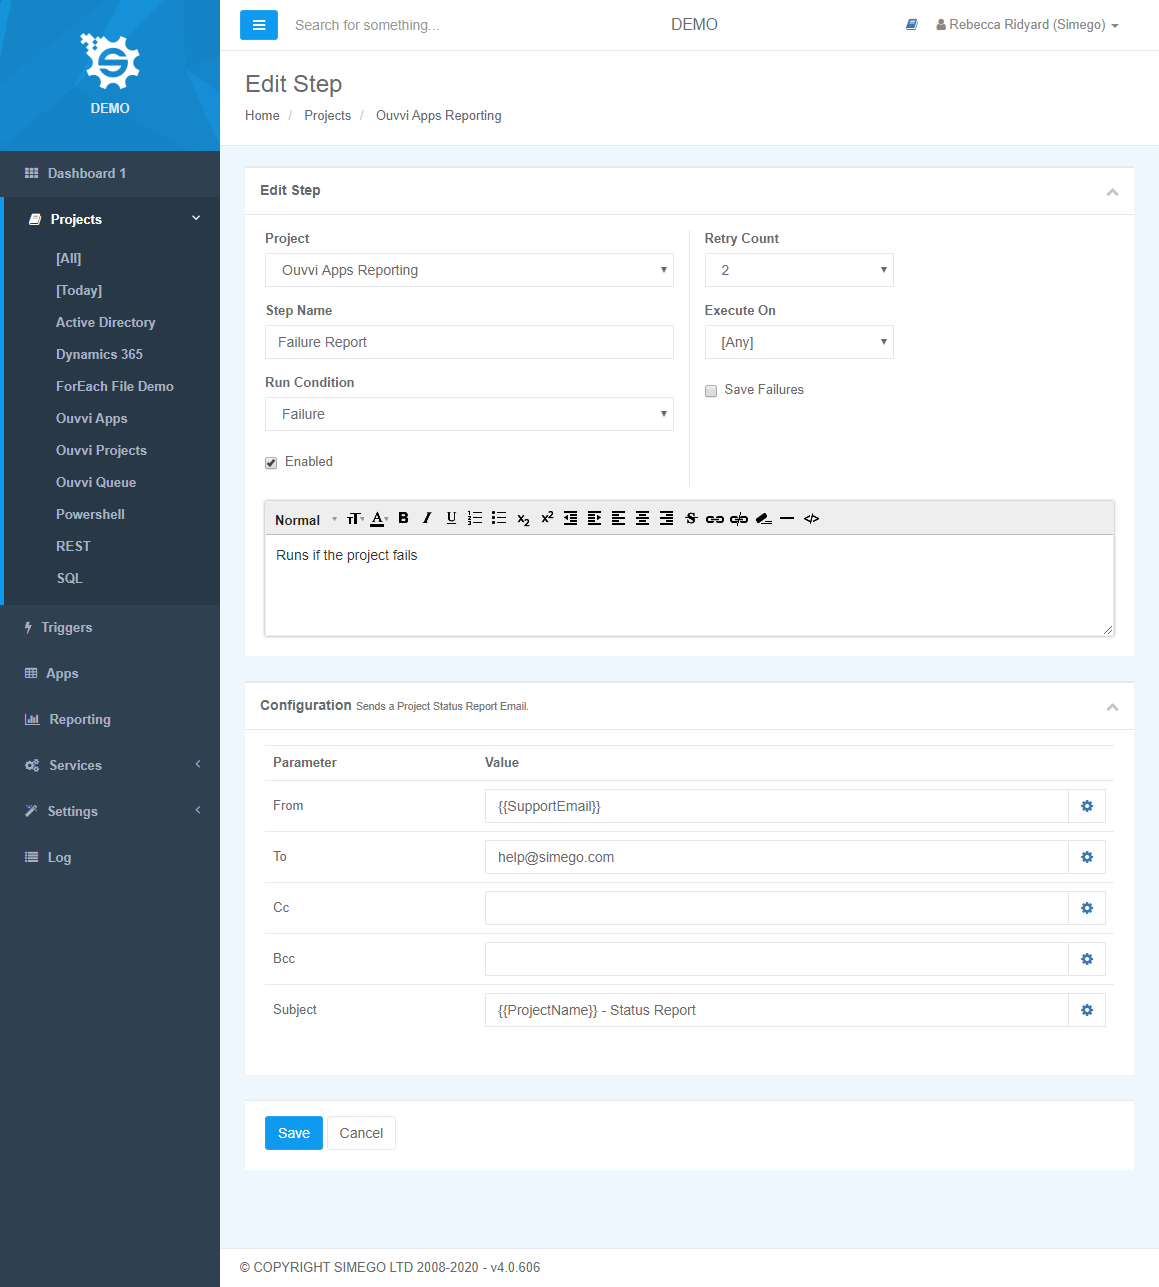
To do this add another step to your Ouvvi project, this time we want to use the Ouvvi Project Status Report step type.
Change the configuration so that the run condition is set to Failure, enter a name for the step and enter in any email addresses you want the failure notification to go to.
The subject line will be pre-populated to the project name - Status Report, but you can edit this as you need to.
Click save to save the step.
Schedule And Run The Project
The final step is to add a trigger to your project to schedule it to run.
To do this click onto Add Trigger and either choose from the list or click onto More... to select from the whole list of triggers. For example you might want to run the project every hour to check for any changes in Podio.
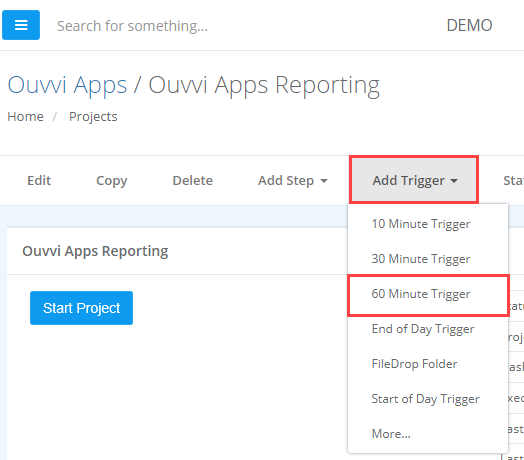
Add the trigger to your project and it will automatically run. If you want to run it now for the very first sync click onto the Start Project button.
At the end of this setup your project should have four steps:
1- A Data Sync step to add the items to the Ouvvi App.
2- A Report step to send you the email with the items that have been added or updated.
3- A Data Sync step to mark the items sent in the report email as sent so then they are not included in the next run.
4- A Project Status Report step to capture if the project fails.
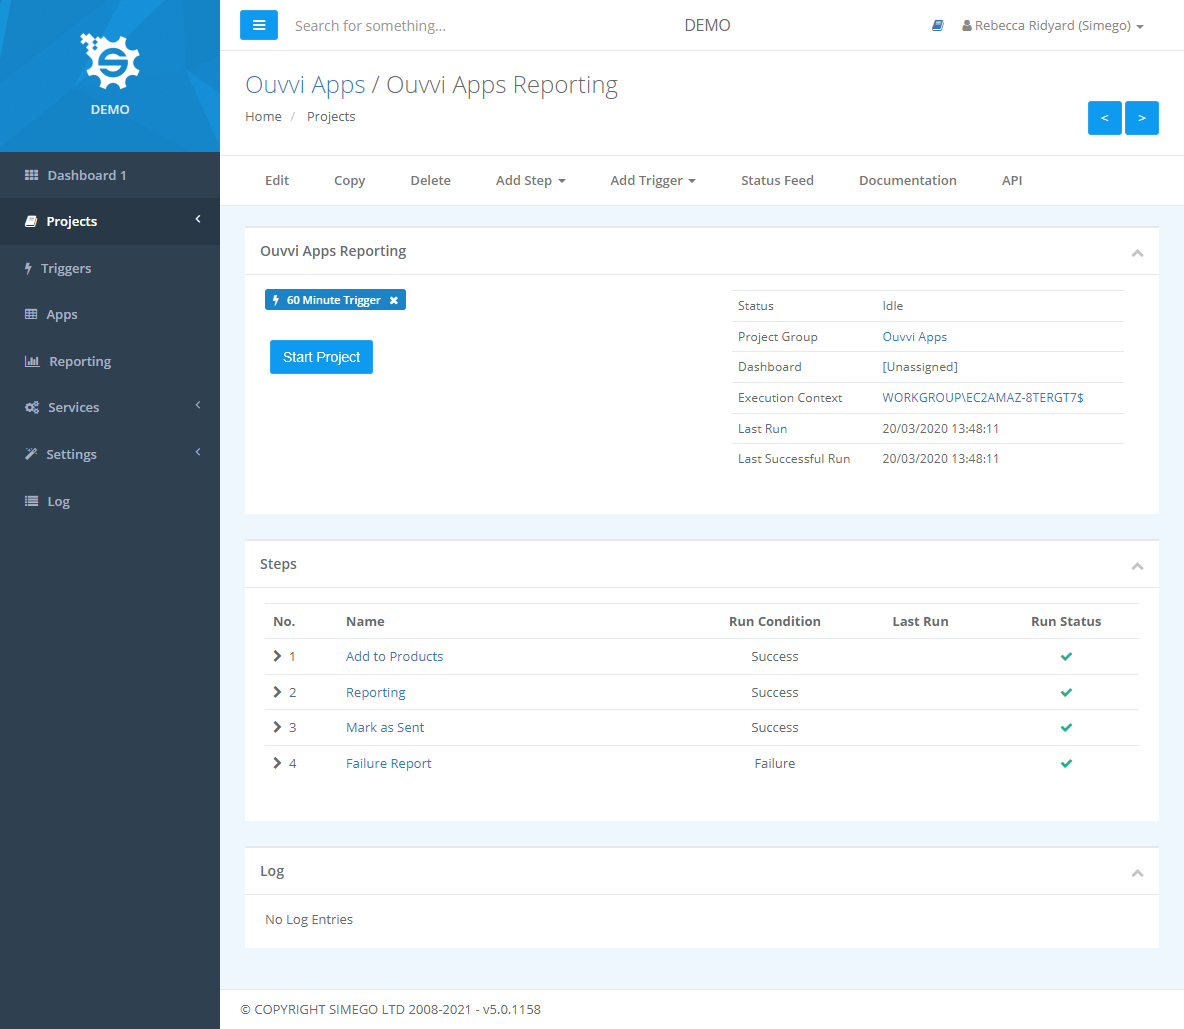
And that is all the setup done. This will run on the schedule you set automatically, so although it may seem like a bit of a long process to set up once it is configured you don't need to worry about it.
If you want to configure this for another Podio App just copy the Ouvvi project and edit the Data Sync steps. Change the Podio connection in the first project to the App you want to watch and create another Ouvvi App using the quick function. You will have the sent Status calculated column in the source window so make sure to add this to the schema mapping before creating the app to save you needing to edit the Ouvvi App. In the other Data Sync step just make sure to connect to the new Ouvvi App.
