If we take an example where our data is listed in a SQL table and we need to get these records into Podio to link customers and projects inside our Podio workspace.
We start by connecting to the source data to the SQL table and the target to the Podio App. Saving each of these connections means that we can use them again in the future and lookups are a simple drag and drop.
When creating projects you need to consider the order data needs to be added: The customer records need to be added before the projects, the projects before the tasks and so on.
The next step is to map the columns from the source to the target in the schema map.
Using Data Sync and the built in connection library you can quickly create lookups into other Podio Apps to expand your current data.
So if your project app looks up the customer details in the customer app then you can add a lookup on either a customer id or customer name to ensure that you have the data you need, where you need it.
If the data isn't contained in your Podio Workspace then you can create a lookup to any source to get the data you need.
To finish you just run a comparison between the source and target, where you can preview the changes about to be made.
You can see the changes broken down into additions, updates and deletes. By default any deletions are disable to make sure your data is safe from accidental deletes.
When you are happy with the data, simply click Synchronise to apply the changes. Your data is then added to Podio.
Saving this project then means you can re-use it whenever you need to and make changes to the schema if your data fields change.
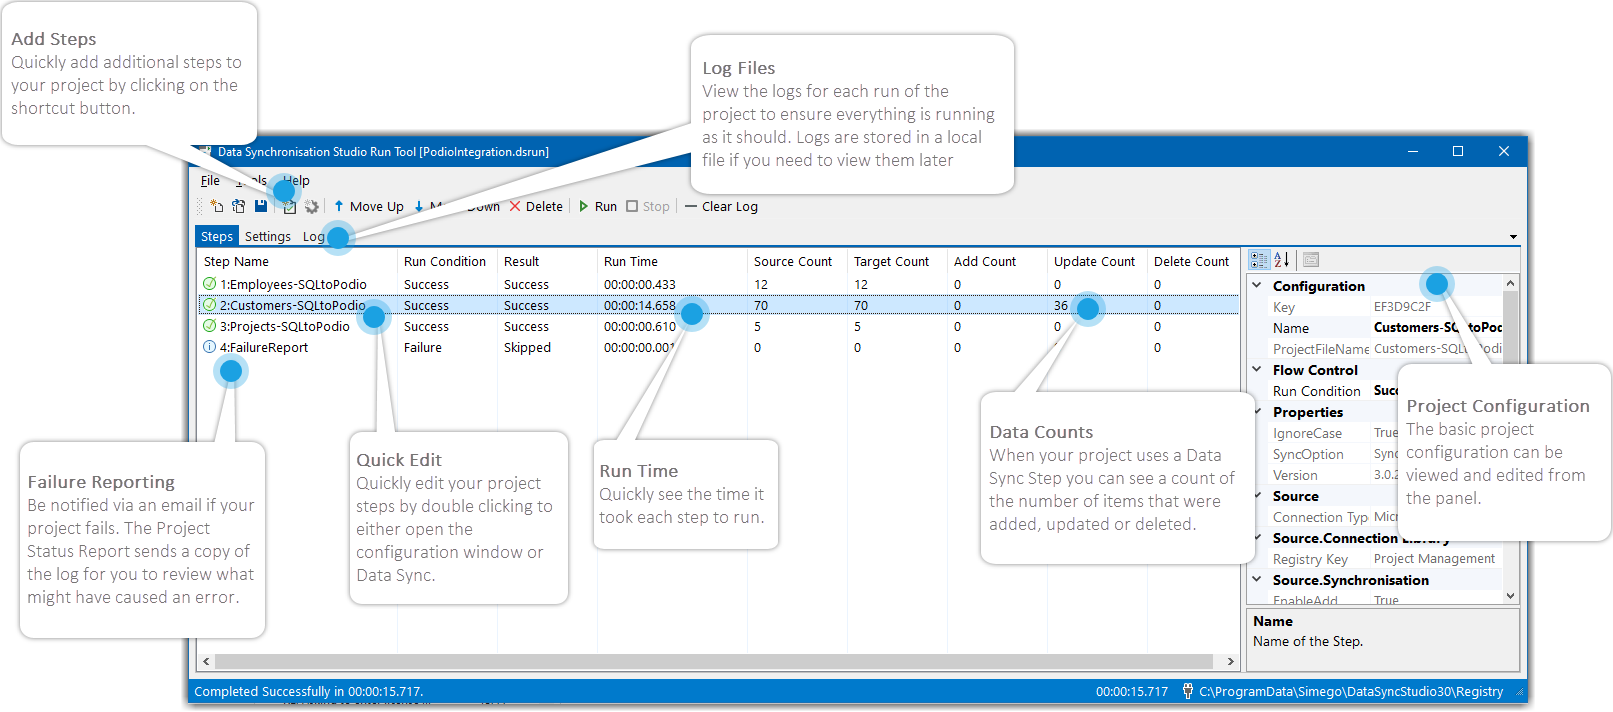
The Run Tool enables you to run multiple tasks in a sequence to form a full integration solution which you can then schedule using Simego Online, Ouvvi or Windows Task scheduler.
Simply add your projects to the Run Tool either creating them from scratch or by drag and dropping from your file explorer, and then order these in the order they need to run. You can add a project status report step so that you are notified whether the project runs, succeeds or fails. If you want it to only send a message if it fails, just change the run condition. Download, copy and delete files, execute SQL statements, execute your existing scripts, it is all possible with the Run Tool designer.
As the Run Tool is based off the file system it makes it easy to add your integration project to source control. This means you can follow a full DevOps path with your development and testing systems ensuring that everything is fully functional before deploying to production.
The Run Tool makes it quick and easy to see how your steps are running and if your project completed successfully.
The built in logging is accessible from the logs tab and will show you the full error exception so that you can understand what has gone wrong.
When designing and testing your steps you can quickly view the error in the Run Tool either by right clicking on the failed step or by going to the logs tab.
When you have built the project and it is running automatically on a schedule, you can view the log file for that run from the local log folder inside your project directory. However the sooner you can find the error the sooner you can fix the issue. Adding the Project Status Report step to your project enables you to be notified as soon as an error occurs.
Once you have the Run Tool configured you can schedule it to run when you need by using Simego Online. As Simego Online is a cloud system you can access it wherever and whenever you need.
Just install an agent onto your machine, enter the path to your project, add a trigger and your jobs will run as and when you need them.
All of the data processing is handled on your machines, so you can be confident that no information is leaving your network. There is no requirement to expose any of your data outside of your own system.
Don't forget you can also add additional projects outside of Podio. There are many options available, so go ahead and give the Simego products a go today!
Connect to Files, SQL, SharePoint, Dynamics, Office 365 and many other data sources
Import your data from various Data Sources quickly and easily. Apply Schema Mapping and Data Type conversion on the fly and Export your data to various formats.
Compare your Data with the target Dataset and create a difference Change set of ADD, UPDATE and DELETE actions to apply rather than drop all data and re-import.
Preview all your data before any changes are applied and select which data you wish to change. Prevent those Oops moments!
Simple and Complex transformations via Calculated Columns, Dynamic Columns and Lookup features.
Use powerful Lookups to lookup data in other Data Sources, Create Mapping Transformation tables and more.
Manage your connection configuration via the Connection Library and quickly and easily connect to data sources from the library.
Automate the execution of your Data Synchronisation Studio packages with Ouvvi, Task Scheduler, SQL Agent, Command Line or API.
Use the .NET Framework to create your own powerful Data Transformation Expressions. Execute your own code before and after the project runs and more.
Use Project Automation to hook into the process and run custom code.